How to Configure Visual Perception Settings with AnySecura | User Guide
AnySecura's Visual Perception Settings let administrators fully configure camera monitoring, anti-photography detection, camera occlusion alerts, policy inheritance, and automated security responses for endpoints.
Visual Perception settings define permissions for clients with Visual Perception authorization enabled.
| Icon | Description |
|---|---|
| Modify Visual Perception permissions for the selected computer or user. | |
| Delete Visual Perception permissions for the selected computer or user. | |
| Export or import policy files, or copy the current policy to other clients. |
Permissions can be assigned to individual computers and domain users. If a computer or domain user has its own permissions, a small red flag appears at the top right of the icon.
Administrators can configure Visual Perception permissions across the network, computer groups/computers, user groups/users, and policy sets. The priority of permission matching (from highest to lowest) is as follows:
User Policy > User Role Policy > User Group Policy > User Group Role Policy > Computer Policy > Computer Role Policy > Computer Group Policy > Computer Group Role Policy.
Lower-priority policies act as parent group policies for higher-priority ones. For example, for a computer policy, all lower-priority policies—including computer role policies, computer group policies, and computer group role policies—serve as its parent group policies.
Visual Perception permissions can inherit parent group policies.
- Inheritance disabled: Only the object's own policy applies.
- Inheritance enabled: The object's policy is combined with parent group policies. If the parent group also has inheritance enabled, the policy continues to propagate upward. If a parent group disables inheritance, only that parent group's policy is inherited.
After setting permissions, administrators can preview the effective permissions for an object. The preview shows the final combined permissions and indicates the source of each permission.
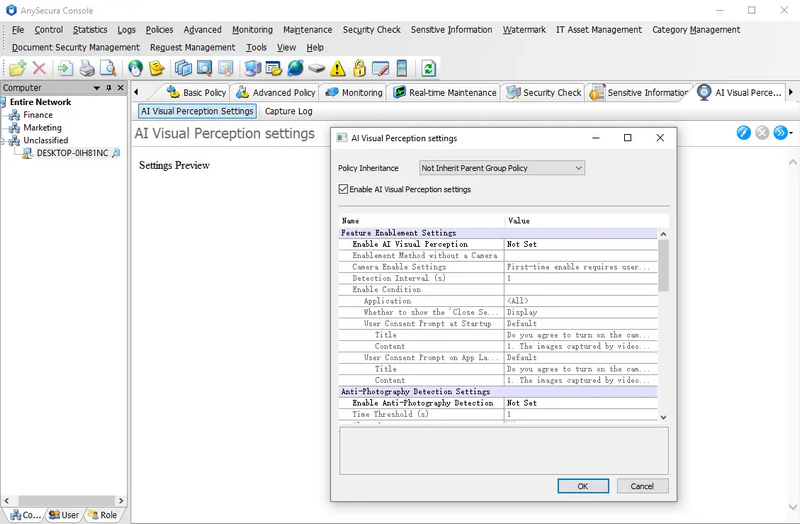
Visual Perception Settings
| Setting | Description |
|---|---|
| Policy Inheritance | Use the dropdown to choose Inherit Parent Policy or Do Not Inherit Parent Policy. Default: Inherit Parent Policy + Visual Perception settings disabled. Enabling inheritance combines policies from different objects, while disabling inheritance applies only the object's own policy. |
| Enable Visual Perception Settings | Check this option to activate the related Visual Perception permissions below. |
| Feature Enablement Settings | Configure the settings for enabling Visual Perception functionality. |
| Enable AI Visual Perception | Specifies whether to enable Visual Perception functionality. Default: Not Set.
|
| Enablement Method Without a Camera | This setting must be configured; otherwise, the settings cannot be saved.
|
| Camera Enable Settings | For clients with Visual Perception enabled, the camera must be activated for the feature to function properly. Camera activation settings include:
|
| Detection Interval | The time interval for detecting abnormal behavior, in seconds. Default is 1 second. Must be set as a positive integer. |
| Enable Condition | Sets the conditions under which the camera is enabled. This must be configured; otherwise, settings cannot be saved. Options include:
|
| Application | This setting is applicable only when the activation condition is "Enable When Using Specified Application." Administrators can manually specify applications or select categories from the application classification. Wildcards are supported. If multiple applications are set, activating any one of them will enable the camera. |
| Wether to Show “Close Sensitive Program” | This setting is effective only when the activation condition is "Enable When Using Specified Application."
When the specified applications are running, the camera is activated. These applications are considered sensitive programs. You can choose whether to display a menu for quickly closing sensitive programs:
|
| User Consent Prompt at Startup | Editable when Enable Visual Perception is set to Enable and Activation Condition is Unconditional Enable. You can choose Default or Custom text. For custom prompts, both the title and content can be specified. |
| User Consent Prompt on App Launch | Editable when Enable Visual Perception is set to Enable and Activation Condition is Enable When Using Specified Application. You can choose Default or Custom text. For custom prompts, both the title and content can be specified. |
| Anti-Photography Detection Settings | Settings related to preventing unauthorized photos using mobile devices. |
| Enable Anti-Photography Detection | Specifies whether to enable anti-photography detection. Default: Not Set.
|
| Time Threshold | The duration in seconds that consecutive photography behavior must be detected. Default is 1 second. |
| Alert Log | Check this option to trigger an alert when photography is detected within the time threshold. |
| Alert Severity | Three levels are available: Low, Important, Severe. |
| Lock Screen | Check this option to lock the screen when photography behavior is detected. |
| Continuous Photo-Taking Duration to Trigger Lock | The consecutive duration in seconds of detected photography required to lock the screen. Default is 1 second. |
| Anti-Photography Whitelist | In certain scenarios, users may need to use their phones for scanning. To prevent these actions from being detected as photography, scanning application windows can be added to the anti-photography whitelist. When a whitelisted window is in the foreground, any detected photography behavior is ignored. Whitelist settings can include the application, window title, and window type. |
| Camera Occlusion Detection Settings | Settings related to preventing unauthorized camera obstruction. |
| Enable Camera Occlusion Detection | Specifies whether to enable camera obstruction detection. Default: Not Set.
|
| Time Threshold | The duration in seconds that consecutive camera obstruction behavior must be detected. Default is 1 second. |
| Alert Log | Check this option to trigger an alert when camera obstruction is detected within the time threshold. |
| Alert Severity | Three levels are available: Low, Important, Severe. |
| Lock Screen | Check this option to lock the screen when camera obstruction is detected. |
| Continuous Occlusion Duration to Trigger Lock | The consecutive duration in seconds of detected obstruction required to lock the screen. Default is 1 second. |
| External Monitor Detection Settings | Settings related to preventing the use of external monitors to bypass camera monitoring. |
| Enable External Monitor Detection | Specifies whether to enable detection of external monitors. Default: Not Set.
|
| Action | Default: Allow
|
| Alert Log | Check this option to trigger an alert when an external monitor is detected. |
| Alert Severity | Three levels are available: Low, Important, Severe. |
| Display Prompt When an External Monitor is Connected | Check this option to show a bubble notification on the client when an external monitor is detected. |
| Desktop Notification Watermark Settings | Configurations related to the system desktop watermark notification box. |
| Enable Desktop Notification Watermark | Specifies whether to enable the desktop notification watermark. Default: Not Set.
|
| Watermark Content | Set the content of the desktop notification watermark. You can choose the default content or customize it.
When selecting custom content for the first time, all fields provide default values that can be adjusted as needed. Customizable items include:
|
| Screen and Capture History Settings | When the client detects a violation, it saves a record of the current screen and captures an image of the scene in front of the client's camera at the time of the incident. Relevant settings for these recordings can be configured. |
| Record Screen and Capture Images during Anomalies | Specifies whether to record the screen and capture images when abnormal or violating behavior is detected. Default: Not Set.
Currently supported behaviors: mobile photography, camera obstruction.
|
| Number of Records | The number of times the client records the screen and captures images when abnormal behavior is detected. Default is 10 times. |
| Record Interval | The time interval in seconds between consecutive screen and image recordings. Default is 1 second. |
| System Unlock Settings | Configurations for unlocking the client after a Visual Perception-related lock is triggered. |
| Unlock Mode | Specifies the method for unlocking the client. Default: Not Set.
|
When Inherit Parent Group Policy is selected, the object's own policy is combined with the parent group policy. The resulting effect is detailed as follows:
Visual Perception Sub-Functions
Includes: Enable Visual Perception, Enable Anti-Photography Detection, Enable Camera Obstruction Detection, Enable External Monitor Detection, Enable Desktop Notification Watermark, and Record Screen and Capture Images on Abnormal Behavior.
If the object's own policy is "Not Set":
- Follows the parent group policy.
- If the parent policy is Enable, the final effect is Enable, and all specific settings are inherited from the parent.
- If the parent policy is Disable, the final effect is Disable.
- If the parent policy is Not Set, the final effect is Disabled.
If the object's own policy is "Enable" or "Disable":
The parent group policy is ignored, and the final effect follows the object's own policy.
Unlock Mode
- If the object's own policy is "Not Set", it follows the parent group policy. If the parent policy is also "Not Set", the final effect defaults to Face Unlock.
- If the object's own policy is anything other than "Not Set", the parent group policy is ignored, and the final effect follows the object's own policy.
Note:
- Object's own policy refers to the highest-priority policy based on the policy matching hierarchy.