
There's no single way to encrypt files on Windows — the right method depends on what you're protecting. This guide walks through five practical scenarios: packaging a batch of files to send out, locking a single file or folder, encrypting sensitive files automatically, protecting a whole disk or USB drive, and keeping a portable vault you can open on demand.
Each one is a step-by-step tutorial with real screenshots, so you can follow along whether you're learning how to encrypt files on Windows for the first time or looking for the method that fits a specific job. Find yours in the table below and jump straight to it:
| When you need to | Method | Works on |
|---|---|---|
| Send a batch of files externally | Password-protected 7-Zip archive | Any Windows edition |
| Lock one file or folder | EFS (built into Windows) | Pro, Enterprise, Education |
| Protect sensitive files automatically | AnySecura transparent encryption | Windows, Mac, Linux clients |
| Encrypt a whole disk or USB drive | BitLocker | Pro, Enterprise, Education |
| Keep a portable vault you open on demand | VeraCrypt container | Any Windows edition |
1. How to Encrypt a Batch of Files Before Sending Them Externally
This is the most common reason people search for how to encrypt files on Windows: you need to send several files to a client, vendor, or auditor, and email or a cloud link alone isn't good enough. The right tool here is 7-Zip — it's free, fully point-and-click, and unlike Windows' own compression feature, it actually supports real AES-256 encryption.
Package and Encrypt Files with 7-Zip
- Install 7-Zip if you don't already have it.
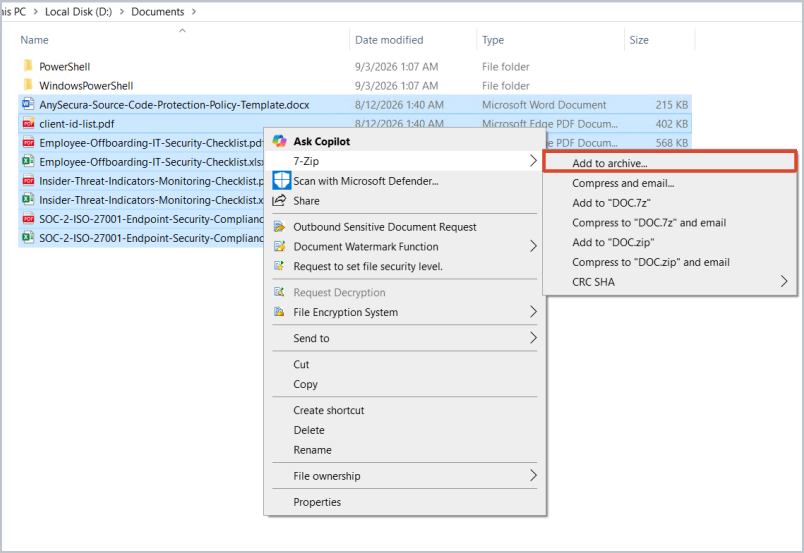
- Select all the files you want to send, right-click, and choose 7-Zip > Add to archive.
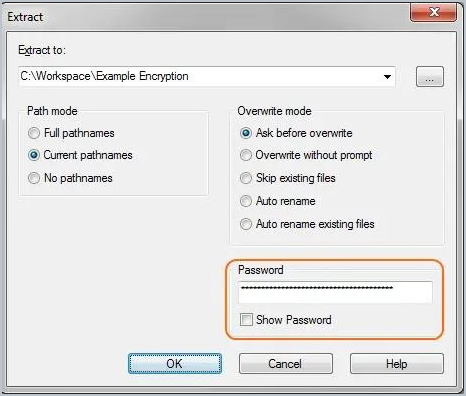
- In the Encryption section, enter a password, re-enter it to confirm, and set Encryption method to AES-256. While you're there, set Archive format to
7zand tick Encrypt file names — without it, someone who intercepts the archive can't open your files, but can still see a list of what's inside.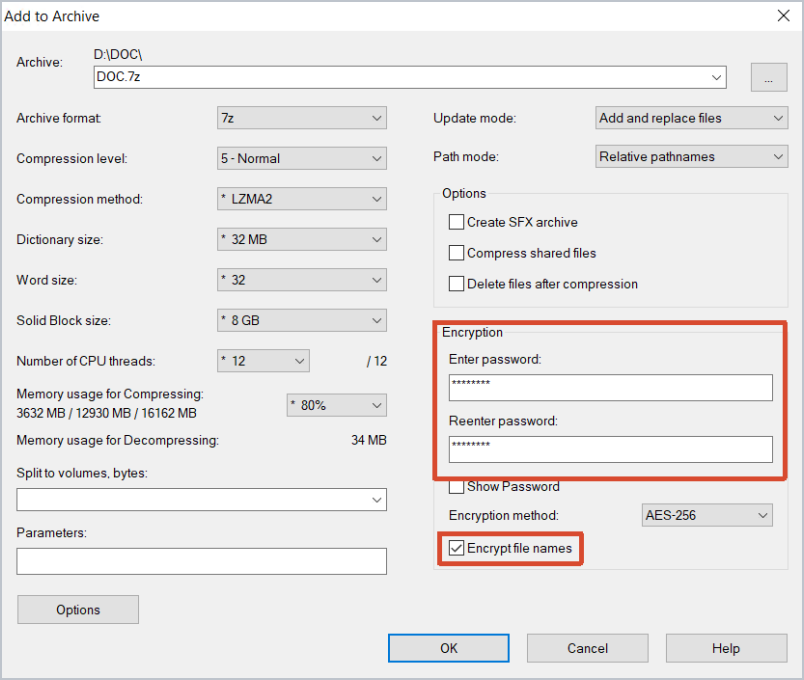
- Click OK. 7-Zip creates the encrypted archive in the same folder as your original files, ready to attach or upload.
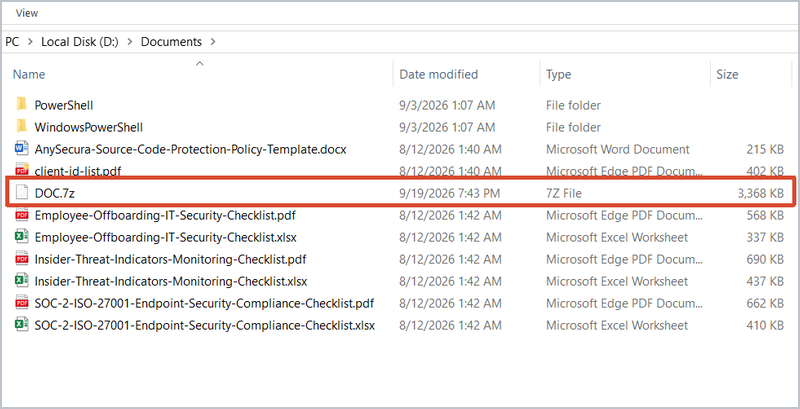
- Don't skip this step: after you've created the encrypted archive, delete the original unencrypted files (or the folder they came from) and empty the Recycle Bin. Otherwise the "protected" archive is sitting right next to a fully readable copy of the same data, which defeats the point of encrypting it in the first place.
- Windows' built-in zip doesn't encrypt: the Compress-Archive PowerShell cmdlet and the right-click Send to > Compressed (zipped) folder option only compress. The password has to come from a tool like 7-Zip.
Open (Decrypt) the Archive Later
On the receiving end, double-clicking the archive and entering the password is enough — no software beyond 7-Zip is required to open it back up.
2. How to Encrypt Specific Files or Folders with EFS
Use this when you don't need to move or share the files — you just want to stop other accounts on the same PC from opening them. Windows' built-in Encrypting File System (EFS) does this without a separate password: it ties encryption to your Windows login. It's available on Windows 10/11 Pro, Enterprise, and Education — Home edition doesn't include it (use Scenario 1 or Scenario 5 instead).
Turn On EFS Encryption
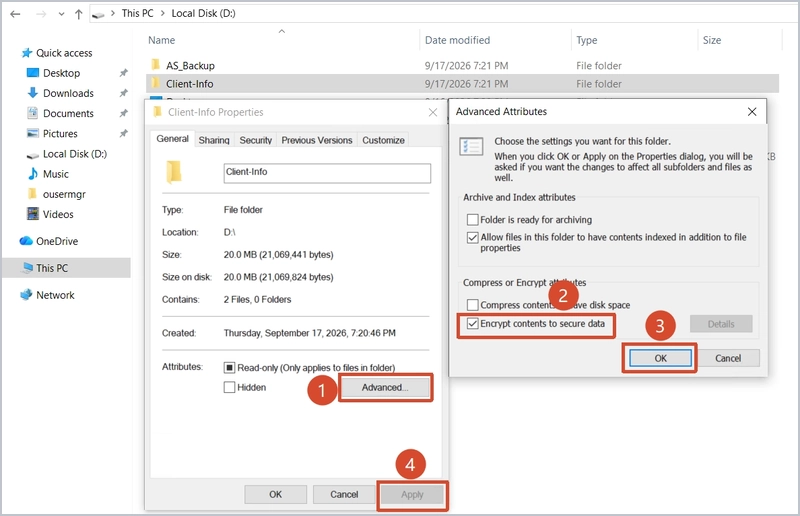
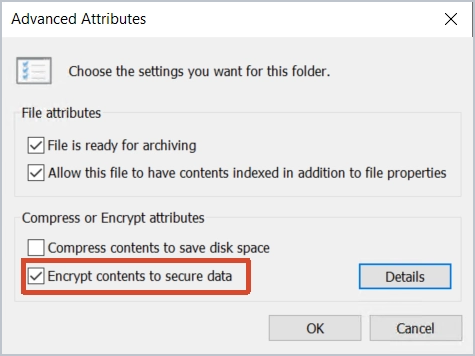
Through File Explorer: right-click the folder or file → Properties → click Advanced → check Encrypt contents to secure data → OK → Apply.
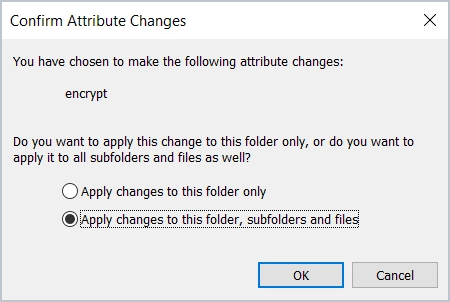
If you're encrypting a folder, Windows asks one more thing before it's done: whether to apply the change to this folder only, or to every subfolder and file inside it as well. Choose Apply changes to this folder, subfolders and files unless you have a specific reason not to — otherwise anything added to the folder later won't be encrypted automatically.
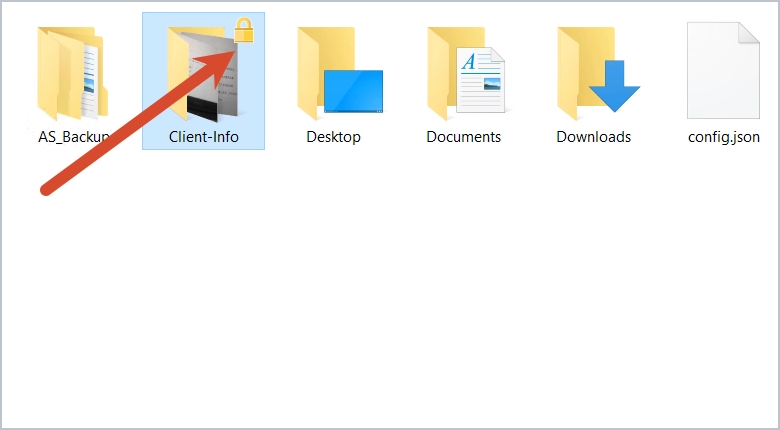
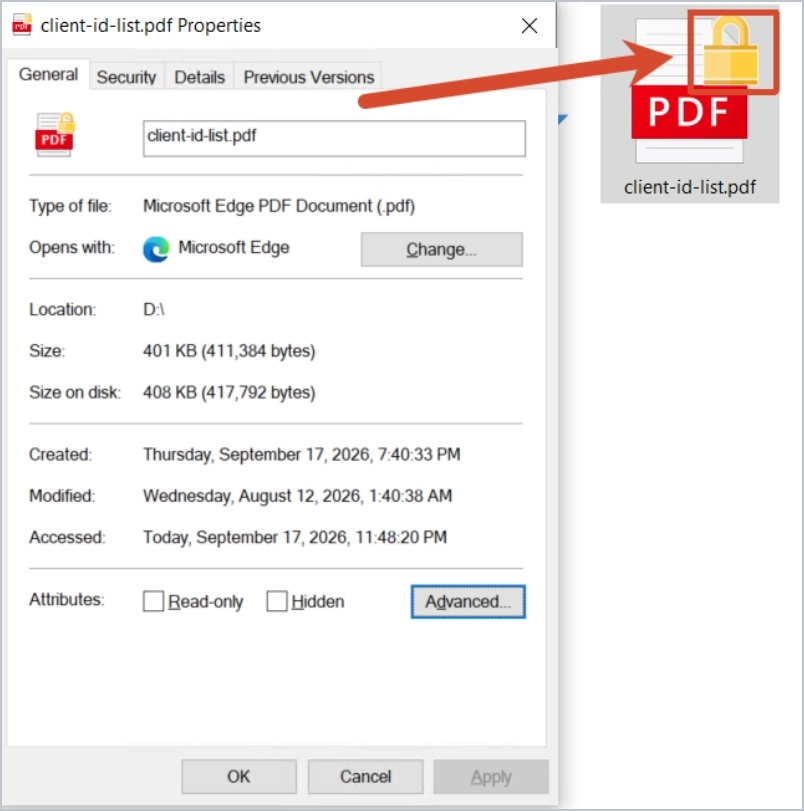
Once it's on, the folder icon shows a small lock badge, and anyone logged into a different Windows account on the same machine sees "Access is denied" if they try to open it — even though the file is still right there in File Explorer.
How to Check Encryption Status and Decrypt a File
These are things you'll come back to later, whenever you need them — not the next step in a sequence:
- Check what's already encrypted: an encrypted file shows a small yellow padlock badge on its icon. The surest way to confirm is right-click it → Properties → Advanced and check whether Encrypt contents to secure data is ticked.
- Decrypt a file or folder: right-click it → Properties → Advanced → uncheck Encrypt contents to secure data → OK → Apply.
3. How to Set Up Automatic, Transparent Encryption for Sensitive Files
The first two methods work, but they both depend on someone remembering to do them — right-click a folder, check a box, or run a command, every single time a sensitive file shows up. For data that actually matters to a business, relying on people to remember isn't a security control, it's a hope. AnySecura's transparent encryption removes the manual step: files are recognized as sensitive and encrypted automatically, based on rules you configure once, and authorized users never notice a difference in how they open, edit, or save them.
Create a Sensitive Information Category
Everything below is driven by one thing: the Sensitive Information Classification Library, where you define what "sensitive" means. It works in two layers — Feature Rules (the actual matching criteria: keywords, ID or contract number patterns) grouped into named Information Categories, which the automatic policies below check every file against. Here's how to build both, using protected health information (PHI) as the example.
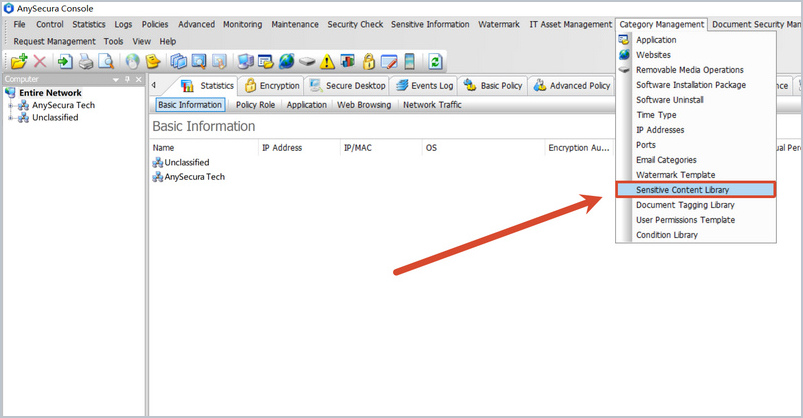
- In the console, go to Category Management > Sensitive Content Library.
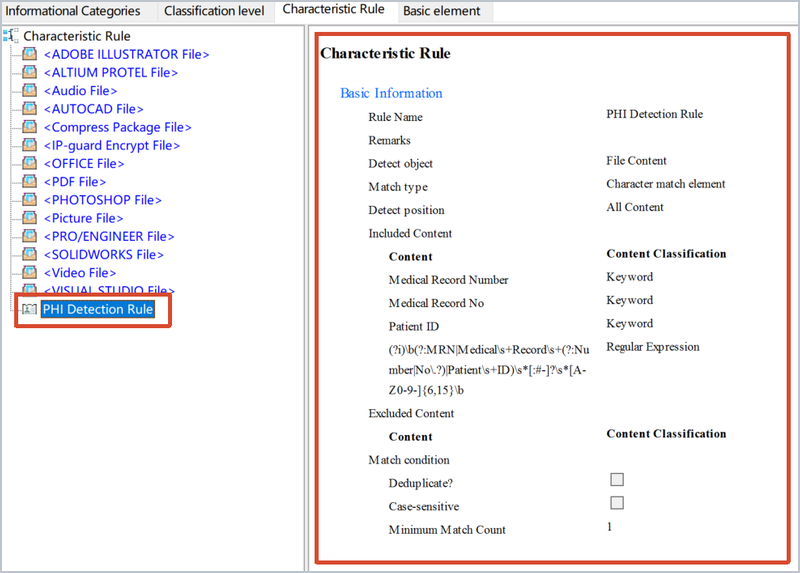
- Set the detection rule. Open the Characteristic Rule tab, right-click Characteristic Rule in the left-hand tree, and choose New Feature Identification. Name the rule PHI Detection Rule, then click the add icon under Included content to add what it should look for: keywords such as Medical Record Number, Medical Record No and Patient ID, plus a regular expression that catches the ID formats themselves:
Click OK to save.(?i)\b(?:MRN|Medical\s+Record\s+(?:Number|No\.?)|Patient\s+ID)\s*[:#-]?\s*[A-Z0-9-]{6,15}\b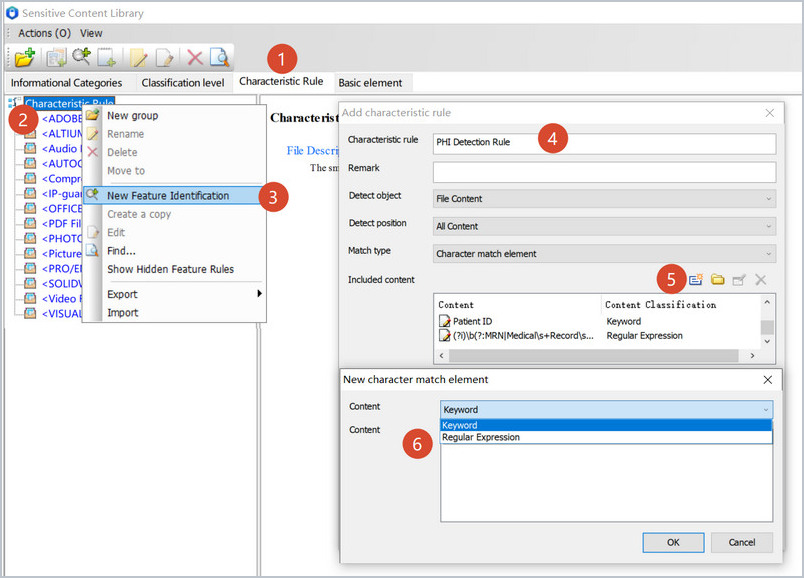
- Confirm it saved. The new rule now appears in the left-hand tree; click it to check its name, detection object and every keyword and expression it includes.
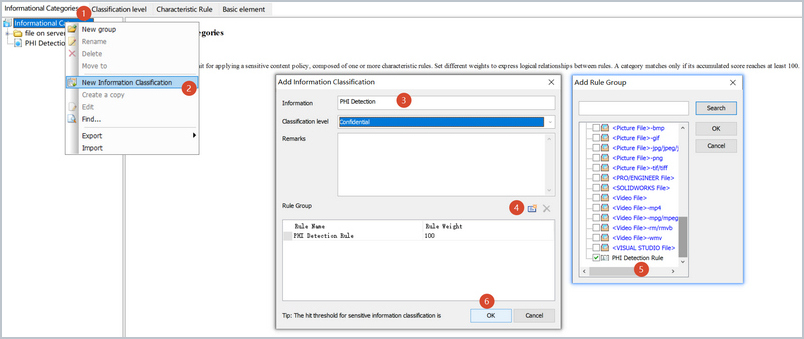
- Group the rule into an information category. Switch to the Informational Categories tab, right-click Informational Categories, and choose New Information Classification. Give the category a name, set its classification level, then click the add icon under Rule Group, tick the PHI Detection Rule you just created, and click OK. This category is what the policies below will reference.
Encrypt Sensitive Files the Moment They Land
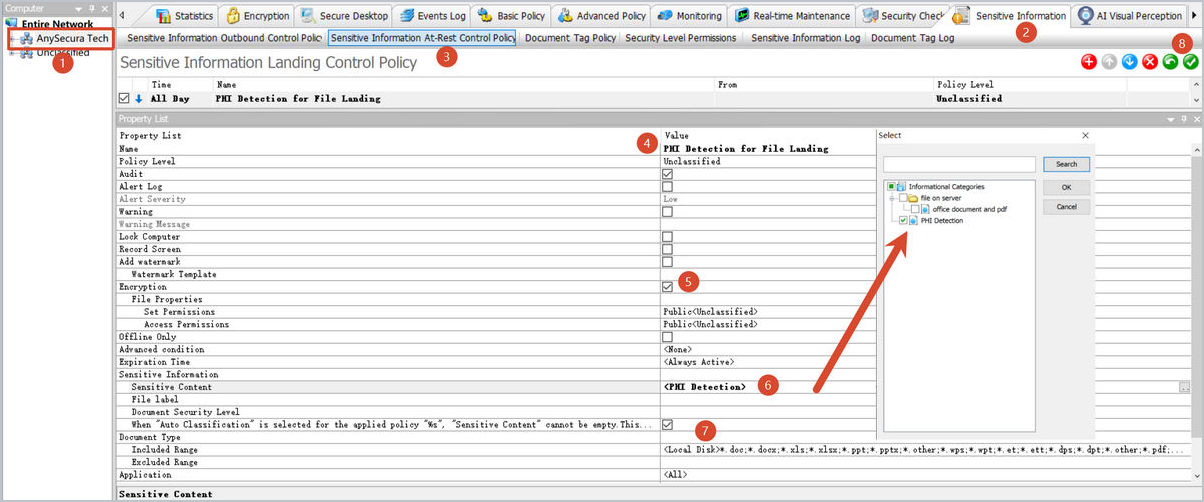
A landing policy watches for files that are created, modified, copied, or received on a device and checks them against the information category you just built. When a file matches and the policy's Encryption option is on, it's encrypted automatically the moment it lands — no dialog box, no checkbox, no chance to forget.
- Select the computer or group the policy should apply to.
- Go to Sensitive Information > Sensitive Information At-Rest Control Policy and add a new policy.
- Give the policy a name, tick Encryption, set Sensitive Content to the PHI Detection category from the previous step, and set the applicable document types to all.
- Save the policy.
Encrypt Sensitive Files When They Leave
An outbound policy evaluates every transfer attempt against the same information category, and can let the file leave only in encrypted form. That's the difference from Scenario 1: instead of a person remembering to open 7-Zip and set a password before sending anything out, the outbound copy is encrypted whether they remember or not.
- Select the computer or group the policy should apply to.
- Go to Sensitive Information > Sensitive Information Outbound Control Policy and add a new policy.
- Set Action to Allow, tick Encryption, and set Sensitive Content to the PHI Detection category. The file is allowed to leave, but only after it's been encrypted.
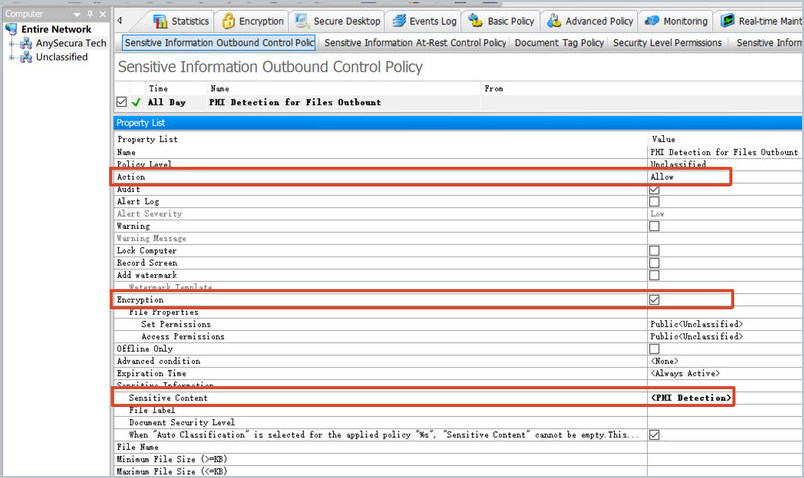
- Tick every outbound channel you want covered — removable media, network copies, IM file transfers and chat messages, email, file uploads and printing — then save the policy.
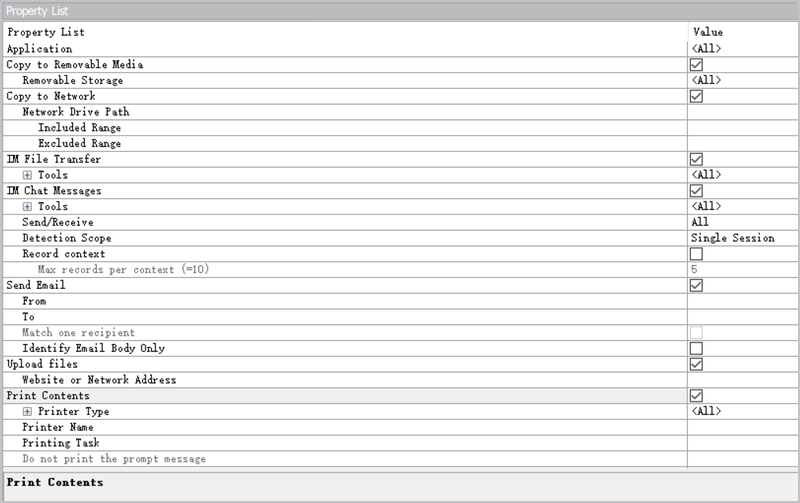
Enable Transparent Encryption for Files Edited in Authorized Applications
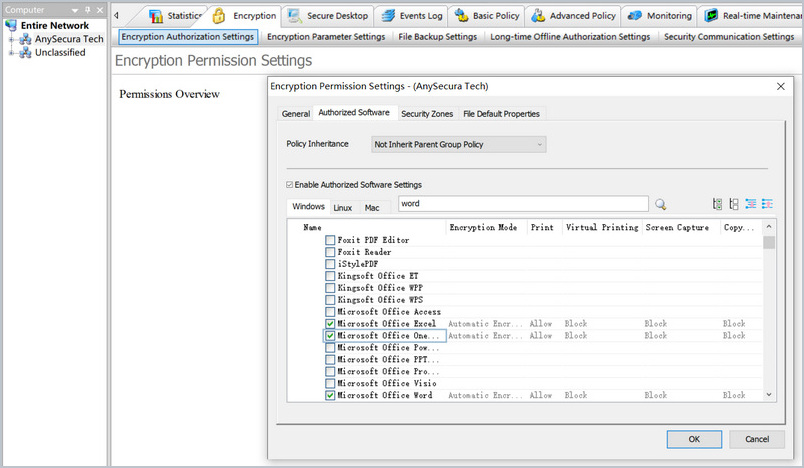
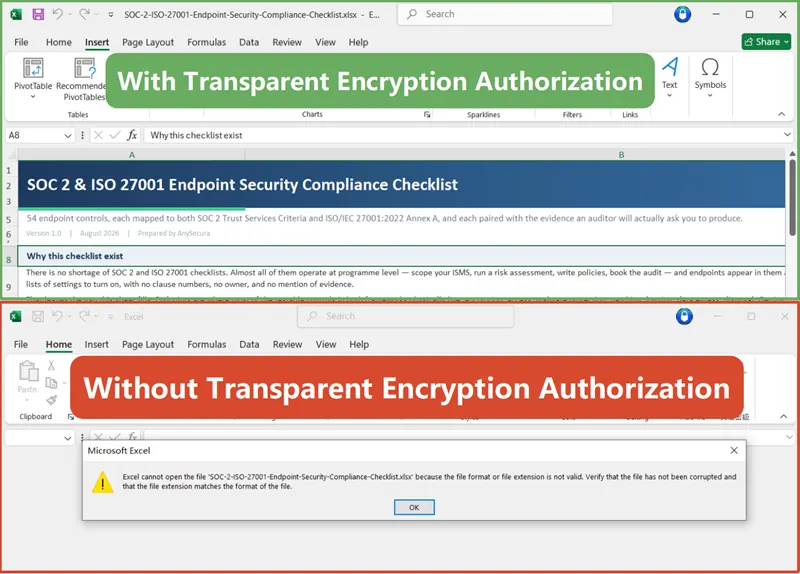
Encryption only stays "transparent" if the applications people already use can still open and save these files normally. Files stay encrypted at rest, but open and save decrypted, seamlessly, inside whatever applications you've authorized. On a device or application without that authorization, the identical file opens as unreadable garbage instead.
- Select the computer or group, then go to Encryption > Encryption Authorization Settings and open the Authorized Software tab.
- Tick Enable Authorized Software Settings, then switch on the software people need to open the encrypted files with — for example Microsoft Word, PowerPoint and Excel — and click OK.
Here's the result: the same encrypted Excel file opens normally on an authorized client (top) and can't be opened on one without authorization (bottom).
Put together, these three policies cover the gap the first two methods leave open: files get protected automatically at the moment they're created, the moment they're sent out, and stay usable — without encryption ever depending on someone remembering a manual step. It's the same automation-first approach behind AnySecura's broader data loss prevention capabilities, just scoped here to encryption specifically.
4. How to Encrypt an Entire Disk or Partition with BitLocker
The first three scenarios protect specific files. This one protects everything on a drive at once — the right move for a laptop that could be lost or stolen, or an external drive you carry around. Windows' built-in tool for this is BitLocker.
Check BitLocker Requirements First
Full BitLocker needs Windows 10/11 Pro, Enterprise, or Education, ideally with a TPM 2.0 chip. Home edition only has a lighter automatic feature called Device Encryption (Settings > Privacy & Security > Device Encryption), which only works on specific hardware and doesn't offer the same management options as BitLocker.
To check whether your PC has a working TPM, open Windows PowerShell as administrator and run:
Get-TpmIf TpmPresent and TpmReady both show True, you're set.
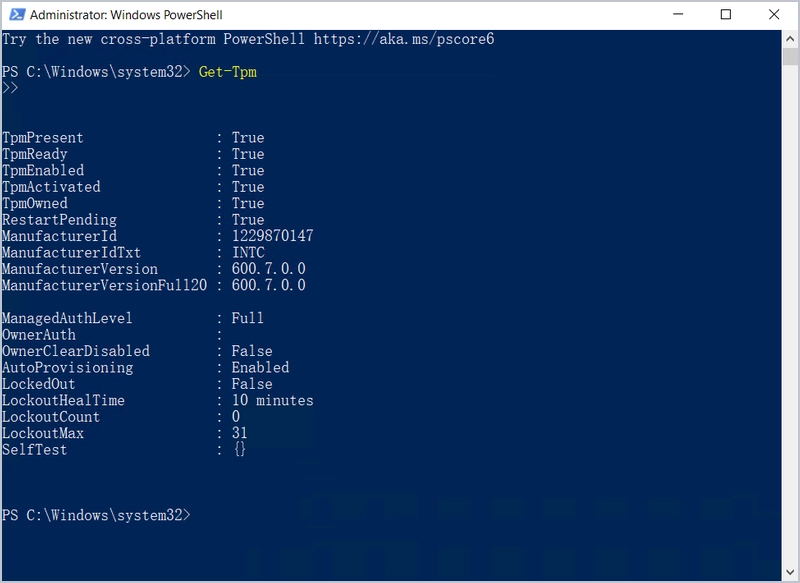
Turn On BitLocker on Your System Drive
Through File Explorer: right-click the drive → Turn on BitLocker.
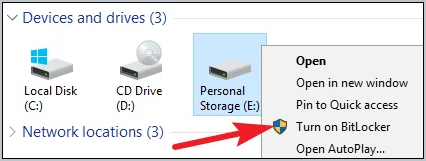
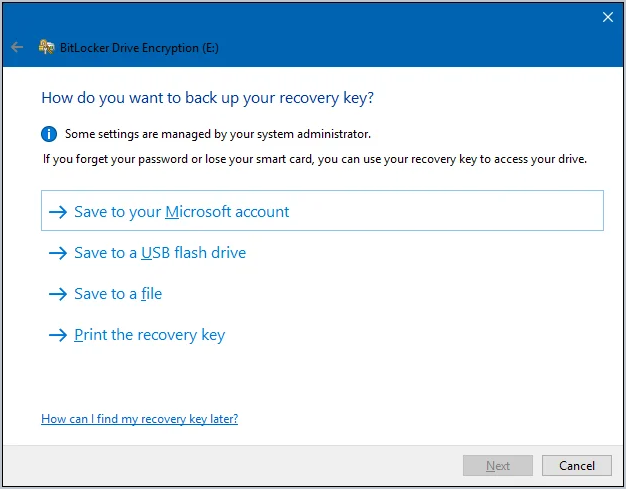
The wizard walks you through choosing how to back up the recovery key — to your Microsoft account, a USB drive, a file, or a printed copy:
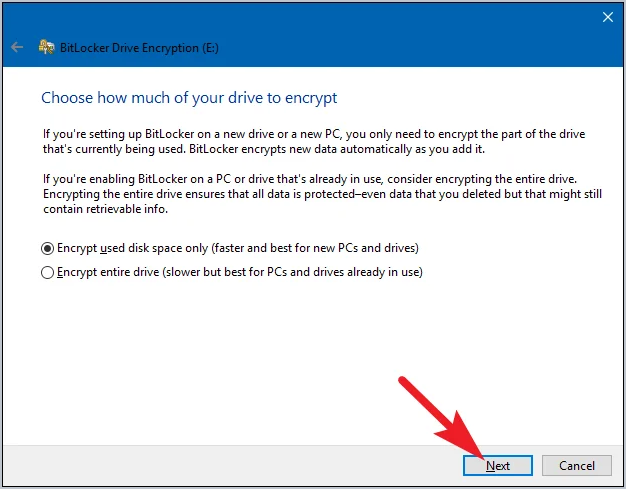
Then how much of the drive to encrypt — used space only is faster and fine for a new PC, while a drive that's already been in use should get the entire-drive option so old, deleted-but-recoverable data is covered too:
Once it's running, the drive shows a small padlock badge in File Explorer.
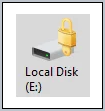
Encrypt a USB or External Drive (BitLocker To Go)
Same right-click → Turn on BitLocker path works for a removable drive too. The one difference: choose a plain password instead of relying on the PC's TPM, since you'll want to unlock the drive on other machines as well.
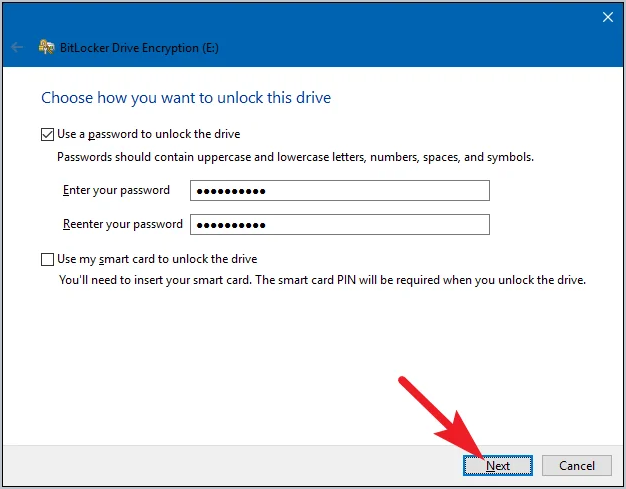
Unlock, Check Status, and Turn Off BitLocker
Plug in or open a BitLocker-protected drive on any PC and Windows prompts for the password (or recovery key) automatically:
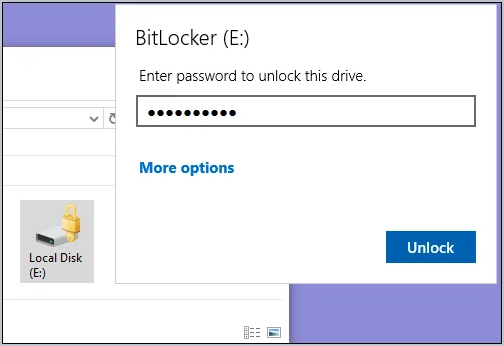
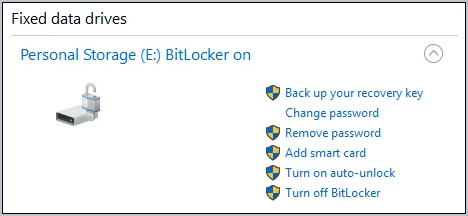
To check status or turn BitLocker off entirely, go back to Control Panel > System and Security > BitLocker Drive Encryption. Each protected drive shows its current state right there, along with a Turn off BitLocker link that fully decrypts it:
5. How to Create and Open an Encrypted Container (Vault) with VeraCrypt
Sometimes you don't want to encrypt a whole disk or tie protection to a Windows login — you want a single portable "vault" file that behaves like its own encrypted drive, works the same way on any PC, and isn't limited to Pro/Enterprise editions. VeraCrypt is the standard free, open-source tool for this, and it's the cleanest way to close the loop on how to encrypt files on Windows when you also need to decrypt and reopen them later, on demand.
Create the Vault
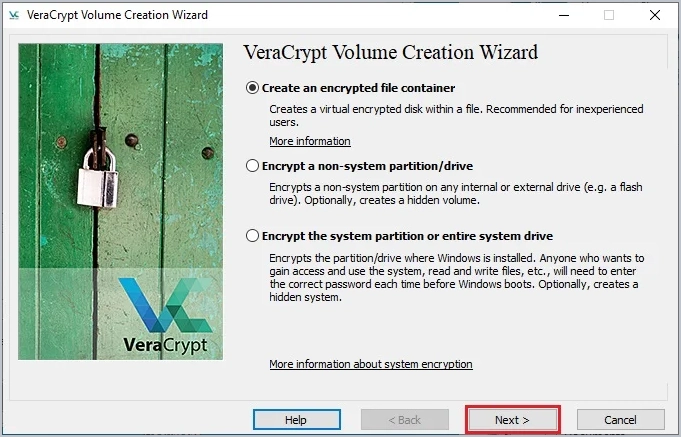
Open VeraCrypt, click Create Volume, and choose Create an encrypted file container in the wizard:
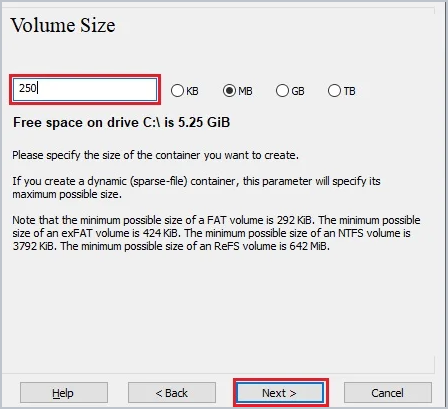
Pick a location and file name for the container, then set its size:
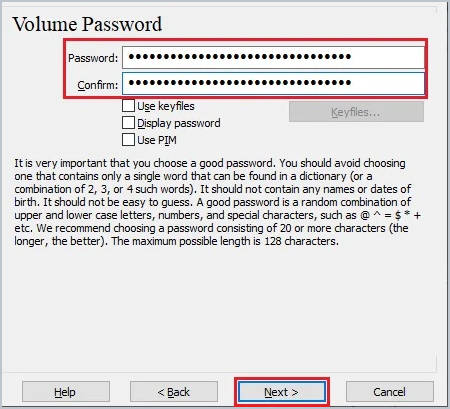
And finally the password that protects it:
The wizard formats the container and you're done — you now have a single file that behaves like its own encrypted drive.
Open (Decrypt) and Close the Vault
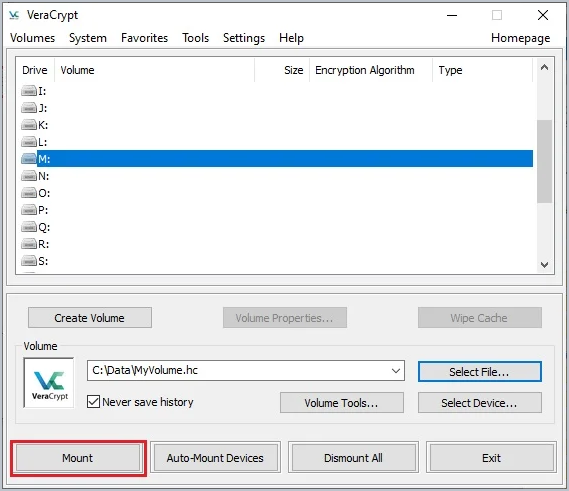
In the main VeraCrypt window, pick a free drive letter, click Select File to point at your container, then click Mount:
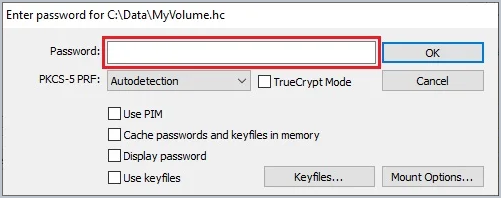
Enter the container's password when prompted:
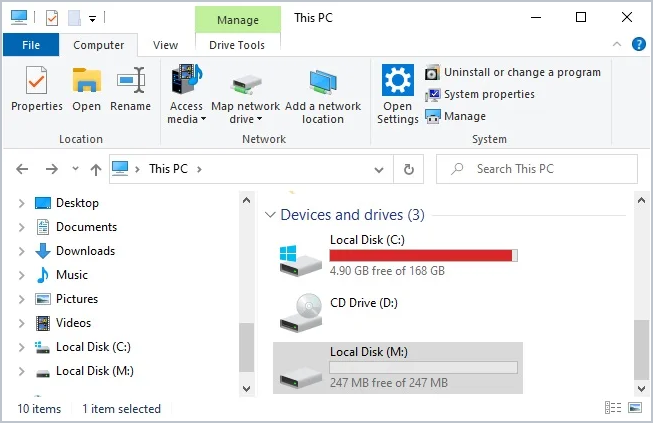
The vault now shows up as its own drive in File Explorer — drag files in and out normally:
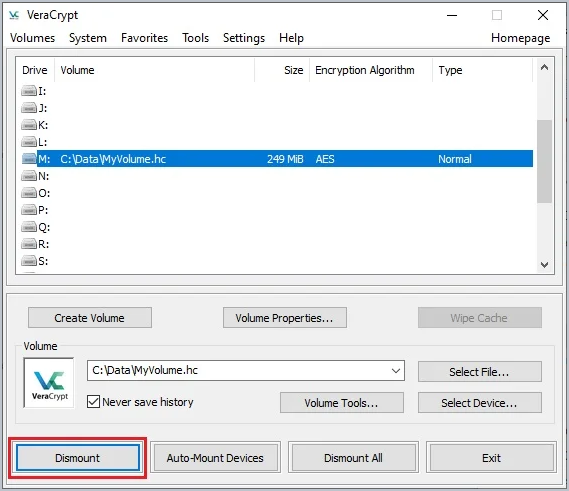
When you're done, select the drive in VeraCrypt and click Dismount to re-lock the contents:
What Happens If You Forget the Password
There is no recovery option and no backdoor: if you forget the container's password, the data inside is gone for good. Store the password in a password manager rather than relying on memory, especially for a vault you don't open often.
FAQs about How to Encrypting Files on Windows
Can I encrypt files on Windows 11 Home without third-party software?
Not really. EFS and full BitLocker both require Windows Pro, Enterprise, or Education — Home edition only has Device Encryption, which automatically encrypts the entire system drive on supported hardware but has no way to lock a single file or folder. On Home edition, use a password-protected 7-Zip archive (Scenario 1) or a VeraCrypt container (Scenario 5) instead; both work identically regardless of Windows edition.
What's the difference between EFS and BitLocker?
EFS encrypts individual files and folders and ties the key to your Windows user account, so the protection travels with the file even if it's copied elsewhere, but anyone logged into your account can still read it. BitLocker encrypts an entire drive or partition at the sector level, protecting everything on it while it's powered off or removed, but once you're logged in normally, every file on that drive is fully readable.
How do I know if a file is already encrypted on Windows?
An EFS-encrypted file shows a small padlock badge on its icon, and its Properties > Advanced dialog shows Encrypt contents to secure data as checked. For a whole drive, reopen Control Panel > System and Security > BitLocker Drive Encryption, which shows each drive's current status and encryption percentage.
What happens if I lose my BitLocker recovery key?
If normal unlock fails and you don't have the 48-digit recovery key, the data is permanently inaccessible — there is no backdoor. Check the places Windows commonly saves it automatically: your Microsoft account, a printed copy, a saved text file, or your organization's Active Directory if it's a work PC. Always confirm the recovery password was actually saved somewhere the moment BitLocker finishes encrypting.
How do I encrypt a USB flash drive on Windows?
Right-click the drive in File Explorer and choose Turn on BitLocker (BitLocker To Go). This works on any edition that supports BitLocker and protects the drive with a password rather than the PC's TPM, so it can be unlocked on other machines too. See Scenario 4 for the full walkthrough.
Is a password-protected ZIP file actually encrypted?
It depends on the tool. Windows' built-in Compress-Archive and Send to > Compressed folder don't support a real password at all, and some older zip tools use a legacy ZipCrypto scheme that's trivial to crack even with a password set. A .7z archive, or a .zip created with AES-256 explicitly selected in 7-Zip, is genuinely encrypted — that's why Scenario 1 uses 7-Zip with AES-256 rather than Windows' native compression.
Do I need admin rights to encrypt a file on Windows?
No admin rights are needed to turn on EFS through the Properties dialog or to create a 7-Zip archive, since both only require write access to the files themselves. BitLocker does require administrator privileges, because it operates on the volume rather than individual files.
How do I back up my EFS encryption certificate?
Open the Start menu, search for Manage file encryption certificates, and run the wizard to export your certificate to a password-protected file, then store that file somewhere off the encrypted PC, such as an external drive. Skipping this step is the single most common way people lose access to their own EFS-encrypted files after reinstalling Windows or moving to a new computer.
Conclusion
The right way to encrypt files on Windows comes down to what you're protecting: a 7-Zip archive for files you're sending out, EFS for a folder on a shared PC, BitLocker for a lost-laptop scenario, and a VeraCrypt vault when you want a portable container that works on any edition. They aren't mutually exclusive — BitLocker on the whole laptop plus an extra layer for one sensitive folder is a common setup.
The manual methods do share one limit: they only protect what someone remembers to encrypt. If that's a concern for your team, an automatic approach such as AnySecura's transparent encryption can cover that gap. Whichever you choose, start with the scenario that matches your situation and build from there.