How to Use Basic Information & Statistics in the Console - AnySecura Manual
This guide will show you how to use the Basic Information & Statistics feature in the AnySecura console to get a clear, real-time picture of your entire environment. You'll learn to view essential details for any computer or user, from their connection status and software version to their last login activity.
With this foundational understanding, you can then efficiently organize these assets into logical groups, customize what information is displayed, and quickly find what you need. This puts you in control, making it easier to manage your network's security posture directly from the AnySecura console.
3.3.1 Viewing Basic Information
Select "Statistics → Basic Information" to view fundamental details of computers, computer groups, users, and user groups.
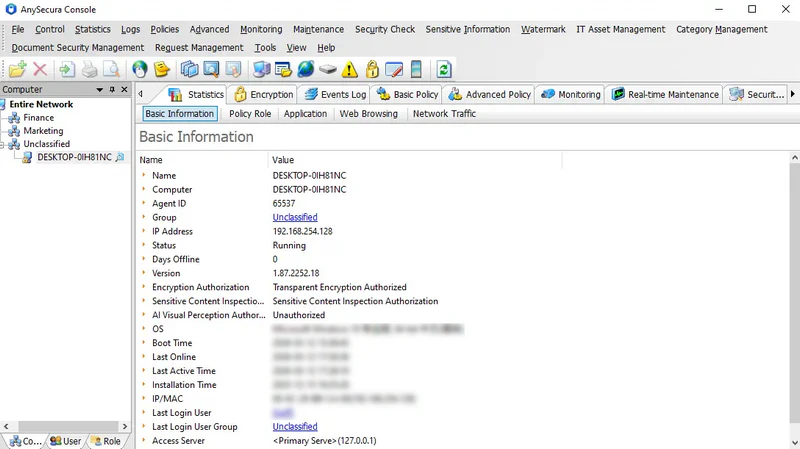
1) Computer Basic Information
Select a computer in the Computer Panel; the Data Display Area will show the client module's status on that machine:
| Field Name | Description |
|---|---|
| Name | The name displayed in the computer tree for management purposes; can be customized. If not changed, it defaults to the computer name. |
| Computer | The actual name of the client machine. |
| IP Address | The IP address used for communication between the computer and the server. |
| Status | The client's operational status: Running, Offline, or Uninstalled. |
| Days Offline | Number of days the client has been offline. |
| Version | The client software version. |
| Operating System | OS version of the client machine. |
| Boot Time | Current startup time of the client; only available when the client is running. |
| Last Online Time | The last time the client communicated with the server. |
| Last Activity Time | The most recent activity time on the client machine. |
| Installation Time | Installation date of the current client version. |
| IP/MAC Address | IP and MAC addresses of all network cards on the computer. |
| Last Login User | The current user logged into the machine; idle and locked states are also shown. |
| Last Login User Group | Group information of the current logged-in user. |
| Connected Server Address | The network address of the server or repeater the computer is connected to. |
| Server Name | The name of the server or repeater the computer is connected to. |
If multiple users are logged in on the same machine, the console will list all current users and their login times below the Last Logged-in User field.
2) Computer Group Information
Select a computer group in the computer panel to view all machines in the group and their status in the data display area.
If you select the entire network, all computer groups will be displayed. Click the Expand button " " to view the status of all machines within each group.
3) User Basic Information
Select a user in the User panel to view their status in the data display area.
| Field Name | Description |
|---|---|
| Name | The name displayed for the client in the user tree. This can be customized for easier management; if not changed, it defaults to the user's name. |
| User | The actual username the client is logged in with. For local accounts, it shows the username; for domain accounts, it shows DomainName\Username. |
| Status | The client's current status, such as Online or Offline. |
| Last Online Time | The most recent time the client was online. |
| Last Activity Time | The most recent activity time for the user on this client. |
| Last Login Computer | The last computer the user logged in from. If the user has logged in from multiple computers, the console displays all computers and corresponding login times beneath this field. |
If the user has logged in on multiple computers, the console will display all the computers they have accessed along with the corresponding login times beneath the "Last Logged-in Computer" field.
4) User Group Basic Information
In the user panel, selecting a user group will display the status of all users and subgroups within that group. Similarly, when viewing the entire network, clicking the Expand button "" at the top-right of the data display area will show the status of all users.
3.3.2 Display Settings
1) Computer Display Information
By default, all client machines in the computer panel show their computer names. You can customize which information is displayed.
Select the entire network, right-click and choose Display. In the Information Display Settings dialog, check the items you want to show. After restarting the console, the client entries in the computer panel will display the selected information. Available fields include: Name, Computer, IP, MAC, Last Logged-in User Account, Last Logged-in User Name, Client ID.
For extended features, checking the corresponding option will display the relevant authorization icons in the computer panel when the feature is licensed: "![]() "represents Sensitive Information Authorization,"
"represents Sensitive Information Authorization,"![]() "represents Visual Awareness Authorization.
"represents Visual Awareness Authorization.
2) User Display Information
In the user panel, all users are shown by default with their username; for domain users, the alias is displayed. You can customize which information is shown for users.
Select the entire network, right-click and choose Display. In the Information Display Settings dialog, check the items you want to display. After restarting the console, users in the user panel will show the selected information. Available fields include: Name, Domain\Account, Account.
Note:
- This setting is specific to the administrator who makes the change. If an admin modifies the display settings, the changes will be visible whenever they log in on any machine. Other administrators will see their own display settings.
3.3.3 Group Management
In the computer and user panels, all client machines and users initially appear under Unclassified. To simplify management, administrators can create custom groups to logically organize these computers and users.
Creating a New Group
In the computer panel, select the entire network or an existing group, then choose File → New Group. A new group node will appear in the tree in editable mode. Enter a group name and drag the relevant computers into this group. Administrators can use the same method to create multi-level group structures.
In the user panel, the same process can be applied to manage user groups.
Note:
- Both computer and user panels have a default Unclassified group. Newly added computers and users are automatically placed in this group. The Unclassified group cannot be deleted, renamed, or have subgroups created within it.
Assigning or Moving to a Group
To assign computers or users to a specific group, or to move them, select the desired objects, then choose File → Move To and select the target group. The selected computers or users will be moved to the chosen group.
Alternatively, drag-and-drop can be used: select the objects, hold down the left mouse button, and drag them to the target group. This applies to both computers (or computer groups) and users (or user groups).
Note:
- To facilitate grouping, multiple computers or users can be selected simultaneously. For example, in Ungrouped, open Statistics → Basic Information, hold CTRL or SHIFT, and select multiple items to move them to a target group.
3.3.4 Search
The search function allows administrators to quickly locate specific computers or users and view their related data.
Searching for Computers
In the computer panel, select File → Find to open the search dialog. Enter the search criteria, which can include:
- Name (as shown in the computer panel)
- Computer name (actual system name)
- Network IP address
- MAC address
The search supports partial matches and multiple keywords separated by semicolons. Computers can also be filtered by group and status, including Online, Offline, Idle, and Locked.
Search results appear in a list below. Double-click a computer to jump directly to its data view. To move one or more computers to another group, select the results, right-click Move To, and choose the target group.
Searching for Users
Switch to the user panel, then select File → Find to open the search dialog. Enter the search criteria, which can include the user's display name or actual username, including any administrator-defined names. Partial matches and multiple keywords separated by semicolons are supported. You can also filter by user group and status, including Online, Offline, and Idle.
Similar to searching for computers, double-click a user in the results list to view their data. To move one or more users to another group, select them, right-click Move To, and choose the target group.
3.3.5 Deletion
Computers or users that no longer require management or access to historical data can be deleted from the console. Select File → Delete to remove the selected computer(s) or group(s) from the computer or user panel. If a group is deleted, all subgroups and computers within it are included.
Deleting Computers
By default, deletion does not uninstall the client to prevent accidental removal. The administrator must explicitly check Uninstall and confirm to remove the client. When uninstalling more than 10 or 100 machines, a reason and quantity must be provided for confirmation.
- Delete only (no uninstall): The client remains on the machine. After deletion, the computer is temporarily moved to the Deleted Group. If the client is online, it will be moved back to its original group immediately; if offline, it will return when next online.
- Delete and uninstall: The client will be removed from the machine. After deletion, the computer is placed in the Deleted Group. Online clients are uninstalled immediately; offline clients are uninstalled upon next connection.
When a computer is in the Deleted Group, the main license and any extended feature licenses are reclaimed. If moved back to the original group, the main license is restored, but extended feature licenses are not. Computers in the Deleted Group can access historical logs but cannot display real-time maintenance data. If the main license is full when moving back, the computer is placed in the Unauthorized Group.
Deleting Users
Deleting a user (or user group) removes their information but does not affect license allocation. Deleted users are placed in the Deleted Group and will automatically return to their original group upon their next login.
3.3.6 Restore
Computers and users in the Deleted Group can be restored to their original groups via the console. Select File → Restore to return the selected computers or users to their original groups.
After restoration, the main license will be reallocated regardless of whether the client was uninstalled.
3.3.7 Rename
To simplify management, administrators can rename computers or users for easier identification. Select the computer(s) or user(s) to rename, then choose File → Rename. The updated name will be displayed in the console.
3.3.8 Data Synchronization
When managing many clients, there may be discrepancies in how quickly data libraries and policies are applied to different machines. Administrators can set priority synchronization for specific computers.
Select the desired computer(s), right-click and choose Data Synchronization → Priority to Sync Data. Any changes to libraries or newly created/modified policies will be synchronized to these computers first. To remove priority synchronization, right-click and select Data Synchronization → Cancel Priority to Sync Data, and the computer will no longer receive prioritized updates.
3.3.9 Policy Export
When new policies need to be applied to offline clients, the administrator can select the corresponding client node, update the relevant policies, then right-click and choose Export Policies. Specify the file path, click OK, and wait for the export to complete. This exports all policies for the selected computer in .ipz format. Selecting the entire network or a computer group will export the policies for that group.
3.3.10 Clear Sub-node Policies
When a group policy is applied, individual computers or users within the group may have their own specific policies, which take precedence over the group policy. If an administrator wants to revoke these individual policies and enforce the group policy uniformly, the Clear Child Node Policies function can be used, avoiding the need to manually remove policies from each computer or user.
In the console, switch to the specific policy, select the computer or user group whose policies need to be cleared, then right-click and choose "Clear Child Node Policies." In the dialog that appears, select the target objects to remove the policies, allowing batch deletion of policies from all child nodes within the group.