How to Use Console and Server Options - AnySecura Manual
This guide will help you personalize your AnySecura console experience, from setting up convenient login behaviors to fine-tuning how you view logs and receive alerts. You'll discover how to tailor the interface to match your workflow and monitoring preferences.
Beyond the console, you can also configure core server operations like data management, client connectivity, and network traffic policies. These settings ensure your AnySecura server runs efficiently and securely, providing a stable foundation for your entire deployment.
Select "Tools -> Options," where administrators can view and modify the default settings for the current console and server.
18.13.1 Console Settings
The console settings allow configuration of parameters for log viewing, real-time information, and real-time alerts.
| Parameter | Description |
|---|---|
| Basic Settings | |
| Login Settings | Actions when logging into the console, including options to remember the password, enable auto-login, and prompt when using an admin account with no password. |
| Close Settings | Actions when closing the console, with options to minimize to the system tray or exit the program, and to display a prompt upon closing (default is to show a prompt). |
| Upgrade Maintenance | |
| When the product is not under warranty | Online upgrade function and reminder settings for when the product is not covered by a warranty period.
|
| Automatic Product Upgrade Check | Online upgrade function, automatic product upgrade check settings.
|
| Sound Settings | |
| Enable Sound | Check this option to receive sound alerts for alarm messages and application notifications in the console. |
| Sound Type | Choose between "Alarm" and "Notification." |
| File Path | Specify the sound file path, which can be selected via browsing. Only .wav files are supported. |
| Log Viewing | |
| Log Query | Set the maximum number of entries displayed per page in the log query. The default is 20 entries per page.By default, the log displays the name of the object's immediate parent group. If "Show Full Path for Group Fields" is checked, the entire group hierarchy will be displayed. |
| By default, the log displays the name of the object's immediate parent group. If "Show Full Path for Group Fields" is checked, the entire group hierarchy will be displayed. | |
| Log Query Conditions | Time range options for log queries:
|
| Application Library Query | The maximum number of applications displayed per page in the application library is set to 50 by default. |
| Real-Time Information | |
| Screen Monitoring | Set the real-time screen tracking interval. The default is 2 seconds.Set the auto-rotation interval. The default is 2 seconds.By default, all screens are displayed. You can choose to show only visible screens. |
| Real-Time Maintenance | Set the tracking interval for the application list. Default is 2 seconds. Set the tracking interval for the process list. Default is 2 seconds. Set the tracking interval for the performance list. Default is 2 seconds. |
| Remote Control | Set the default actions during remote control. Options include locking the remote computer's mouse and keyboard or viewing only the controlled computer. |
| Real-Time Alerts | |
| Alert Window | Set the number of records to display in the alert window. The default is 500 records. |
| Buuble Settings | Check this option to display real-time alerts triggered by policies on this console machine.Set the minimum alert level for popups: Low, Important, Severe. |
| Client Offline Alerts | Enable client offline alerts and set a specific duration (e.g., 10 days). The console will show an alert with a list of clients that have been offline for 10 days or more. |
| Client Abnormal Alerts | Enable client abnormal alerts. When an abnormal client is detected, an alert will pop up showing the list of abnormal clients. |
| Encryption Function | |
| Encryption Serial Number Warning | Enable a reminder when the encryption serial number is not registered. An alert will pop up when the serial number is unregistered.Enable a reminder when the encryption serial number expires. An alert will pop up when the serial number expires. |
| Encryption Approval Process Reminder | Enable reminders when saving changes to the approval process. A message will pop up stating, "If there are current requests in approval, modifying the process may invalidate the request and require resubmission." Disable this option to prevent the reminder. |
| Encryption Approval Process Reminder | Enable reminders when saving changes to the approval process. A message will pop up stating, "If there are current requests in approval, modifying the process may invalidate the request and require resubmission." Disable this option to prevent the reminder. |
| Encryption Application Notification Reminder | Enable pop-up notifications for encryption, external sending, document property changes, and temporary offline applications. A bubble alert will appear for these actions. Disable this option to prevent the pop-up alert. |
18.13.2 Server Settings
The server settings allow configuration of multiple system parameters:
| Parameter | Description |
|---|---|
| Patch Options | |
| Automatically Install Patches on New Clients | Check this option to automatically install downloaded patches on newly installed client machines. Otherwise, new clients will not automatically install patches. Administrators can enable this option upon their first login to the console. |
| Automatically Download Newly Discovered Patches | Check this option to automatically download patches discovered during scans. Otherwise, newly discovered patches will not be automatically downloaded. Administrators can enable this option upon their first login to the console. |
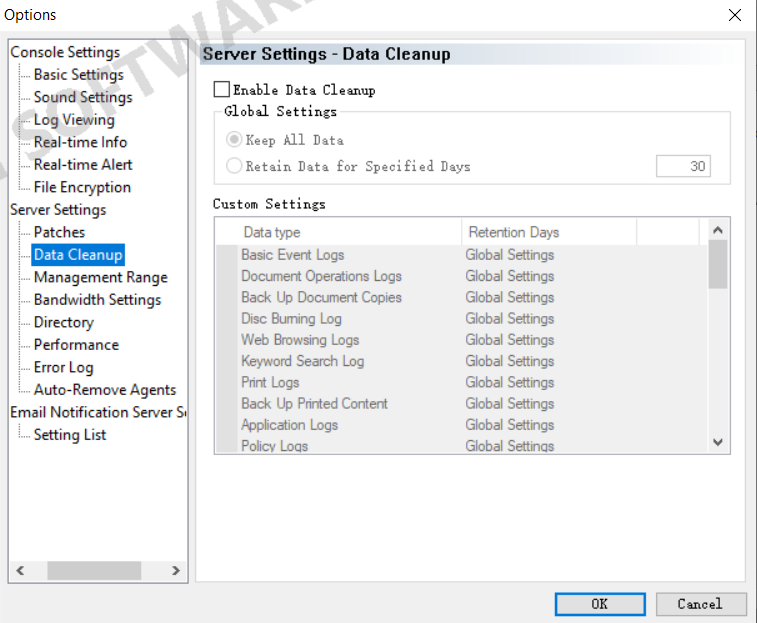
| Data Clearing | Default is to not clear data. Check "Enable this feature" to activate data clearing. |
| Global Settings | By default, all data is retained, and the server will not delete any data. You can choose to retain data for a specified number of days. The default is 30 days, and data older than 30 days will be deleted. |
| Custom Settings | You can set retention periods for different types of log data individually. The default retention period is "Global Settings," meaning data will be deleted according to the global configuration. You can also customize and set specific retention days or choose to retain all data. |
| Management Range | |
| Search Range | You can add an IP address range for the server to search for client machines. This is typically used when clients cannot actively connect to the correct server, and the server should enable active polling. |
| Allow Connections Only from Search Range | Check this option to restrict connections to the server to only those client machines within the specified search range. |
| Exclusion Range | You can add an IP address range to exclude certain client machines from connecting to the server. Clients within the exclusion range will not be able to connect to the server. |
| Bandwidth Settings | Configure traffic policies to limit the bandwidth for client machines within a specified network range, preventing excessive bandwidth usage that could affect other common communications.Click the "New" button  to set the network address, restriction time, and traffic limits, creating a new traffic policy. Multiple traffic policies can be created. to set the network address, restriction time, and traffic limits, creating a new traffic policy. Multiple traffic policies can be created. |
| Connection Settings | |
| Bandwidth Settings Between Server and Client | The bandwidth range is from 1 to 102400 KB/s. Typically, bandwidth limitation is unnecessary in a local area network (LAN), but may be useful for VPN networks. |
| Active Polling | The server will actively connect to client port 8235 within the licensed client list. This is enabled by default. If unchecked, the server will not actively connect to clients. |
| Directory Settings | |
| Data Directory | Administrators can change the storage paths for various data files, including: data directory, cache directory, software distribution, backup emails, screen history, backup documents, and Microsoft product patches.The default directory is the AnySecura installation directory. Administrators can modify this, but existing data will not be automatically moved to the new directory. The server must be stopped, and data must be manually moved to the new directory. The new directory settings take effect only after restarting the server. |
| Set Directory | Click the "Set" button " |
| Restore Initial Directory | Click the "Restore" button " |
| Remaining Space Management | |
| Minimum Available Storage | When the available storage (including data and cache directories) falls below this value, data collection will stop, and a popup alert will appear. |
| Remaining Storage Alert Value | When the available storage (including data and cache directories) falls below this value, a popup alert will appear, but data collection will continue. |
| Performance Settings | |
| Fixed Mode | Fixed mode sets the maximum number of clients the server can handle concurrently, with a range of [0-100]. |
| Dynamic Mode | In dynamic mode, the server automatically adjusts the number of clients it can handle concurrently based on the load. The "Standard" load level means the server uses 30% of the database process's average CPU. If set to "High," the upper limit is 50%, and if set to "Low," it's 10%.
|
| Error Settings | |
| Record Errors During Client Validation | Check this option to record error messages. Server error logs can be viewed under "Logs -> System Events." |
| Minimum Error Level | Defines the severity of error messages recorded:
|
| Client Auto-Deletion | |
| Automatically Delete Inactive Clients | Check this option and set the number of inactive days (default is 30 days). The next time you log into the console, clients that have been inactive for 30 days or more will be automatically deleted.
|
Traffic Settings
The traffic settings in server parameters are managed through traffic policies.
Various management operations can be performed on the policies:
| Icon Button | Description |
|---|---|
 |
New,Click this button to create a new policy. |
| Edit,Click this button to modify the selected policy. | |
 |
Delete,Click this button to delete the selected policy. |
 |
Move Up,Click this button to move the selected policy up by one position. |
 |
Move Down,Click this button to move the selected policy down by one position. |
Click the "New" button to set the network address, restriction time, and traffic settings, creating a new traffic policy. Multiple traffic policies can be created.
The parameters for creating a new policy are explained as follows:
| Parameter | Description |
|---|---|
| Network Address | The network address range where the policy applies. Options include All, LAN, External Network, Enterprise Network, Internet, or custom settings in Category Management. |
| Restriction Time | The time period during which the policy is active. Options include: All Day, Working Hours, Break Time, Weekend, Custom Time, or pre-set options in Category Management. |
| Traffic Settings | |
| Total Traffic | The total traffic limit for all IPs within the network address range. You can limit the traffic sent from the server to clients, received from clients, or both. Each setting is an integer value, or can be left unset to remove restrictions. |
| Individual Traffic | The traffic limit for each individual IP within the network address range. You can limit the traffic sent from the server to the client, received from the client, or both. Each setting is an integer value, or can be left unset to remove restrictions. |
Policy Matching Principle
The policy matching is performed top-down, and each IP can match only one individual traffic limit and one total traffic limit.
- Policies are matched based on priority.
- Each policy can include both individual and total traffic limits. When matching a policy, both individual and total traffic must be checked. (The purpose of having both individual and total limits is to allow special IPs and ensure the bandwidth of a specific outbound line is not exceeded.)
Example 1
If you want to limit the traffic between each client and the server within a specific IP range (192.168.2.50-192.168.2.100) to a maximum of 200KB, you can set the policy as follows:
Network address: 192.168.2.50-192.168.2.100, Individual traffic limit: "Limit total send and receive traffic to 200KB/S".
Example 2
If you want to limit the total traffic between all clients and the server within a specific IP range (192.168.2.50-192.168.2.100) to a maximum of 2MB, you can set the policy as follows:
- Network address: 192.168.2.50-192.168.2.100
- Individual traffic limit: "Limit total send and receive traffic to 200KB/S".
Example 3
The following conditions apply:
- External client computers connect to the company network via VPN (assigned to the IP range 192.168.10.1-192.168.10.254). Each machine has a bandwidth of 1MB, but the communication traffic with the AnySecura server should not exceed 500KB.
- The internal bandwidth is also limited to 10MB in total, with the requirement that the bandwidth used by AnySecura should not exceed 5MB. The internal network range is 192.168.9.1-192.168.9.254.
- A monitoring computer at an important office (192.168.10.10) needs priority control, with a bandwidth limit of 2MB/s.
To set up the policy, follow these steps:
- Add a network address category named "VPN Access Segment" with the content: 192.168.10.1-192.168.10.254;
- Add a network address category named "Corporate Intranet" with the content: 192.168.9.1-192.168.9.254;
- Set the first traffic policy: For the network address, select the "VPN Access Segment" and "Corporate Intranet" categories. Total traffic limit: "Limit total send and receive traffic to 5MB/s". Individual traffic limit: "Limit total send and receive traffic to 500KB/s".
- Set the second traffic policy: For the network address, set it to 192.168.10.10. Individual traffic limit: "Limit total send and receive traffic to 2MB/s".
18.13.3 Email Report Service Settings
Before using the email report feature, the system administrator must configure the email report server in "Tools -> Options -> Email Notification Server Settings".
| Parameter | Description |
|---|---|
| Settings List | Add, modify, or delete email report server settings. |
Email Report Server Settings List Button Descriptions:
| Icon Button | Action |
|---|---|
|
Create a new email report server setting, entering the email server setup page. |
| Delete the currently selected email report server setting. | |
| Re-edit the currently selected email report server setting. | |
|
Move the currently selected email report server setting up one position. Default settings are not affected and remain at the bottom. |
|
Move the currently selected email report server setting down one position. Default settings are not affected and remain at the bottom. |
| Set the currently selected email report server as the default server. | |
| Cancel the current email report server's default status. |
Email server settings are matched from top to bottom. If a rule matches, this setting will be used to send emails. If no settings match, no emails will be sent.
When adding or modifying an email alert server, the following items need to be configured:
| Parameter | Description |
|---|---|
| Basic Information | |
| Configuration Name | A user-defined description for the server. When adding an email server, the console will default to a name, but the administrator can customize it. |
| Sending Server Information (SMTP) | |
| Email Server Address | The address of the email server, which can be either an IP address or a domain name. |
| Port | The SMTP port, default is 25. |
| SMTP Account | The SMTP account. |
| Password | The password associated with the SMTP account. |
| Require Secure Connection (SSL) | Check this option to use a secure connection (SSL) for sending emails. |
| Encryption Connection Type | By default, set to "None," meaning the email server will not use an encryption protocol for sending emails.
|
| Sender Email Information | |
| Sender Email Address | The email address used to send alert emails. |
| Nickname | The sender's nickname displayed in the email. |
| Matched Email | |
| Email Set | A collection of email suffixes used to receive alert emails, separated by ";", e.g., @gmail.com;@outlook.com. |
Policy Example
If the internal email system of the company cannot send or receive emails from external networks, both internal and external email accounts need to receive alert emails. In this case, two email servers need to be set up: one for internal emails and one for external emails.
- Set up one email server, matching email addresses with: @companyname.com.
- Set up another email server, matching email addresses with: @gmail.com, and set this server as the default.