How to Use Organizational Structure Synchronization - AnySecura Manual
This guide will help you set up the Organizational Structure Synchronization feature within the AnySecura Tools module. You'll learn how to mirror your existing Active Directory groups to the server, allowing you to pre-assign computers and users before they even connect.
By walking through the configuration steps, you'll understand how to establish a connection, define synchronization rules, and manage the process. This ensures that when a new client joins your network, it is automatically organized into the correct AnySecura group, streamlining your security management.
The organizational structure synchronization feature allows the AD domain structure to be synced to the AnySecura server. Computers and users in the AD domain that are not yet connected to the server can be pre-assigned to groups. When a client connects to the server, it is automatically placed into its designated group.
Select Tools -> Server Management -> Organizational Structure Synchronization to access the Organizational Structure Synchronization management interface.
18.11.1 Synchronization Configuration
Select Organizational Structure Synchronization -> Synchronization Configuration to add, modify, delete, or execute synchronization for AD or LDAP servers. You can also view the synchronization configuration details.
| Icon | Description |
|---|---|
| Add a synchronization configuration. | |
| Modify the selected synchronization configuration. | |
| Delete the selected synchronization configuration. | |
| Execute the selected synchronization configuration immediately. | |
| View the selected synchronization configuration to see its execution results; if none is selected, display results for all configurations. |
Note:
- When viewing a synchronization configuration:
- If the target is set to Users, the synchronization results are immediately visible in the configuration view after execution.
- If the target is set to Computers, and no computers have connected to the server yet, only the synchronized computer group structure is visible; individual computers will appear in the corresponding groups only after installing the client and connecting to the server.
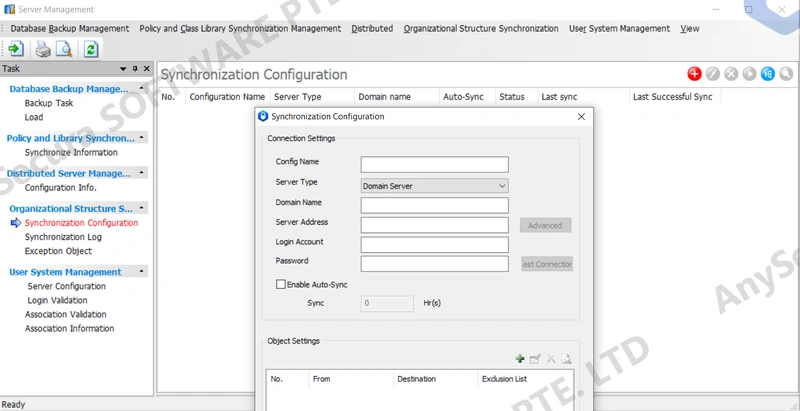
Add Configuration
Click the icon ![]() or select Add Configuration from the right-click menu in the Synchronization Configuration interface to create a new synchronization configuration. When adding a configuration, you need to set the AD connection and specify the synchronization targets.
or select Add Configuration from the right-click menu in the Synchronization Configuration interface to create a new synchronization configuration. When adding a configuration, you need to set the AD connection and specify the synchronization targets.
| Parameter | Description |
|---|---|
| Connection Settings | Enter AD or LDAP server details so the server can connect and retrieve the organizational structure. |
| Configuration Name | Name of the configuration; if left blank, the domain name will be used by default. |
| Server Type | Select the server type: Domain Server or LDAP Server. |
| Domain Name | The domain name of the server to be synchronized. |
| Domain Server Address | The IP address of the server to synchronize.
|
| Login Account | If a Domain Server is selected, enter a domain user account authorized to access the AD structure. |
| Password | Password for the AD domain login account. |
| Enable Automatic Synchronization | Default is unchecked. Check this option and set the synchronization interval to enable automatic synchronization according to the specified interval. |
| Object Settings | Specify which domain objects (including domain computers and users) are synchronized to designated locations on the server. A single synchronization configuration can contain multiple object settings, enabling multiple synchronization relationships.
|
| Source Settings | Configure the source for the domain synchronization, specifying which organizational units (OUs) in the domain to synchronize.After configuring the connection settings, click Test Connection. Only when the connection succeeds can the source settings be selected. |
| Source Selection | Click the icon button |
| Exclusion List | Click the icon button |
| Target Settings | Specify where the selected domain organizational units will be synchronized in the console. Supports synchronization to computer groups and user groups. |
| Computer Group | Click the icon button |
| User Group | Click the icon button |
| Other Settings | Miscellaneous settings |
| Do Not Import Empty OUs | If checked, OUs with no objects in the source will not be imported; if unchecked, all selected OUs will be imported. Checked by default. |
| Sync Only Source Computers | Only clients corresponding to computers in the source domain OUs are synced to the console’s computer groups. |
| Sync Only Source Users | Only clients corresponding to users in the source domain OUs are synced. When a client connects, the logged-in user is matched to the source users; if a match is found, the client is synced to that user’s group. If no match, the client is placed in “Ungrouped.” |
| Sync Source Computers and Users (User Priority) | Synchronize client machines to the console’s computer group based on both computers and users from the source domain organizational units.After a client installs the client software and connects to the server, the logged-in user on the client is first matched against the source users. If a match is found, the client is synced to that user’s group in the source; if no user match is found, the client computer is then matched against the source computers. If a computer match is found, the client is synced to that computer’s group in the source. If neither user nor computer matches, the client is assigned to the ungrouped category. |
| Sync Source Computers and Users (Computer Priority) | Synchronize client machines to the console’s computer group based on both computers and users from the source domain organizational units. After a client installs the client software and connects to the server, the client computer is first matched against the source computers. If a match is found, the client is synced to that computer’s group in the source; if no computer match is found, the logged-in user on the client is matched against the source users. If a user match is found, the client is synced to that user’s group in the source. If neither computer nor user matches, the client is assigned to the ungrouped category. |
18.11.2 Synchronization Logs
Select Organization Structure Sync -> Synchronization Logs to view logs of organizational structure synchronization.
The synchronization log contains the following details:
| Attribute Name | Description |
|---|---|
| Operation Type | Includes: Add, Move, Rename, Failure. |
| Object Type | Type of synchronized object, including Computer, Computer Group, User, User Group. |
| Object Name | Name of the synchronized object. |
| Description | Description of the event corresponding to the object type. |
Note:
- When organization structure synchronization is abnormal, check the synchronization logs to identify the cause of the error.
Synchronization logs can be queried using the following criteria:
| Query Criteria | Description |
|---|---|
| Time | General query condition. |
| Operation Type | Defaults to All; you can also select a specific operation type from the dropdown. |
| Object Type | Filter by object type to view synchronization logs for a specific type. |
| Object Name | Search by object name to find logs for a specific object; supports fuzzy search. |
| Description | Search by description; supports fuzzy search. |
18.11.3 Exception Objects
For computers or users that need to be assigned to specific groups and should not follow the AD organizational structure, they can be set as exception objects. During manual or automatic synchronization, exception objects will not be synchronized.
Select "Organization Sync -> Exception Objects" to add, modify, or delete exception objects. Once the AD organizational structure has been synchronized to the server, manually moving a computer or user within the synchronized range in the console's structure tree will trigger a confirmation prompt. Confirming the move will automatically set these objects as exception objects.