How to Use Full-Disk Scan Tasks in Sensitive Information - AnySecura Manual
This guide will help you set up a powerful AnySecura feature to discover and protect sensitive data across your network. You'll learn how to configure full-disk scan tasks that automatically identify and log files containing confidential information on multiple client computers.
We'll then walk through the detailed settings, showing you how to define what to look for, where to scan, and what actions to take—such as encrypting files to secure them immediately. By the end, you'll be able to confidently deploy these scans to enhance your organization's data security posture.
Administrators can configure full-disk scan tasks for multiple clients simultaneously. These tasks scan local disks on target clients, identify and log files containing sensitive information, and optionally encrypt the identified files.
Administrators with the permission Permissions → Sensitive Information → CConfigure Sensitive Information Full Disk Scan Tasks can access the full-disk scan task settings via Sensitive Information → Full-Disk Scan Tasks in the menu.
10.9.1 Set Task
Steps to set up a full-disk sensitive information scan task:
- Click the Add button
 in the top-right corner to open the Create Scan Task dialog.
 - In the General tab, configure the basic settings.
- Switch to the Advanced tab to configure advanced settings.
- After finishing the configuration, click OK to create the scan task successfully.
General Settings Explanation:
| Setting Option | Description |
|---|---|
| Task Name | The name of the current task. The system provides a default name, which can be modified. |
| Select Target | Choose the target computers for the task. Click the button |
| Sensitive Information | Configure the sensitive information to scan for. |
| Sensitive Content | Check this option and specify the information classification. Files containing the specified sensitive content classification will be considered a match. |
| Document Security Level | Check this option and set the classification range. Files within this classification range will be considered a match. |
| Match Any Condition | By default, all selected sensitive information criteria must be met for a file to be considered a match. Checking this option allows a file to be considered a match if it meets any one of the selected criteria. |
| Scan Path | Specify the paths to scan. By default, all local drives are included. You can set local paths, network paths, or mapped drive paths, using commas or semicolons to separate multiple paths.
Example: C:\;D:\ — only scans drives C and D.
You can also use predefined identifiers to scan specific types of drives:
|
| Included Files | Files within this scope will be scanned. You can select from the predefined file types or click the |
| Search Files in Archives and Compound Files | Check this option to identify documents containing sensitive content within compressed archives. |
| Excluded Files | Files within this scope will not be scanned. You can select from the predefined file types or click the |
Note:
- The exclusion scope takes priority over the inclusion scope.
Advanced Settings Explanation:
| Setting Option | Description |
|---|---|
| Task Options | Configure the specific actions the task will perform. |
| Scan Mode | Select the scanning mode from the dropdown:
|
| Backup Copies | Scan documents on the client, back up files that match the specified information classifications, and record them. Logs with a pin icon in the sensitive information logs allow viewing and downloading of the backup documents. |
| Non-encrypted to encrypted | Scan documents on the client; any plaintext matching the specified information classifications will be encrypted. The operation is recorded in the Encrypted Document Operation Log as "Encrypted – Sensitive Content Scan Task." The encrypted file's attributes are set according to the File Attributes specified below. |
| Security Property Change of Encrypted Files | Scan documents on the client. Encrypted files matching the specified information classifications will have their security attributes modified. The operation is recorded in the Encrypted Document Operation Log as "Modify Document Attributes – Scan Task."
There are three modes for changing security attributes:
|
| Set Document Security Level | Scan documents on the client. Files matching the specified information classifications will have a document classification added, defaulting to "Unclassified" (no classification).
You can modify this under Set Document Classification below, with options for Specified Classification, Automatic Classification, and whether to allow Downgrading.
|
| Scan Settings | Configure the scanning task. |
| Scan Schedule | Set the task start time by selecting the appropriate category from the dropdown, which aligns with the categories in Time Type Management. |
| Scan Frequency | Set the scan frequency:
|
| Performance Settings | Configure system performance during the scanning task. |
| Prioritize Scanning Speed | Scanning is faster but may impact system performance. Recommended for non-working hours. |
| Prioritize System Performance | Scanning is slower to minimize resource usage and maintain system performance. Recommended for working hours. |
| Scan Only When Idle | Scans specified files only when the client is idle. Idle status is shown as "Running (Idle)" on the console. |
| File Size | Only files within the specified size range will be scanned. |
| File Security Attributes | When scanning and encrypting, defines the security attributes of sensitive files after encryption, including permissions and access rights. Encrypted files inherit these settings. |
Note:
- 1. The "Encrypt" option will not appear if the encryption module is not purchased.
- 2. A scan task cannot be created if any of the selected computer objects, included files, sensitive content, or document classification fields are empty.
- 3. When an administrator creates a full-disk sensitive information scan and selects "Encrypt," the document security attributes are subject to the security zones and levels of the files themselves.
- 4. Once a full-disk sensitive information scan task is created, its settings cannot be modified. Ensure all configurations are correct before creating the task.
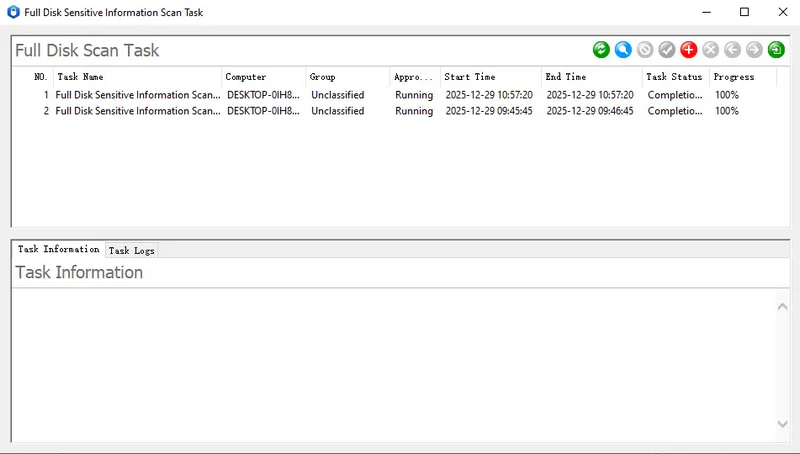
10.9.2 View Task Information
Current Task Information
In the upper section of the full-disk scan interface, you can view the task's basic information.
| Item | Description |
|---|---|
| Task Name | The name of the scan task. |
| Computer | The client computer's name. |
| Group | The group to which the client belongs. |
| Status | The current running status of the client. |
| Start Time | The time the task started. |
| End Time | The time the task ended. |
| Task Status | The current status of the task:
|
| Progress | Shows the task completion progress, updated automatically. |
Other Task Information
By selecting a client in the lower view under the "Task Information" tab, you can view detailed settings for that client's scan task, including all configurations set when the encryption task was created.
Note:
- Full-disk sensitive information scan tasks run only once and cannot be repeated.
10.9.3 View Task Logs
In the full-disk sensitive information scan interface, select a client and go to the "Task Logs" tab in the lower view to see the task execution logs for that client. Use the refresh button on the toolbar to update the log.
| Item | Description |
|---|---|
| Time | The time when the log entry was generated. |
| Task Name | The name of the task being executed. |
| Content | Includes the task's completion percentage, the directory currently being scanned, and key details such as the number of documents scanned and the number of sensitive items matched. |
10.9.4 Enable/Disable Scan Function
Disable
By default, the scan function on a computer is enabled. In the full-disk scan interface, select one or more tasks and click the "Disable" button ![]() , or choose "Disable Scan Function" from the right-click menu. The selected tasks will be paused.
, or choose "Disable Scan Function" from the right-click menu. The selected tasks will be paused.
Enable
Select one or more paused tasks and click the "Enable" button ![]() , or choose "Enable Scan Function" from the right-click menu. The selected tasks will resume execution.
, or choose "Enable Scan Function" from the right-click menu. The selected tasks will resume execution.
10.9.5 Delete Task
Select one or more tasks and click the "Delete" button ![]() , or choose "Delete Computer Task" from the right-click menu. The selected tasks will be removed.
, or choose "Delete Computer Task" from the right-click menu. The selected tasks will be removed.
10.9.6 Search Computer Tasks
Click the "Search" button
Click the "Search" button ![]() to open the query selection dialog. Choose the specific computer or computer group and click "OK." The computer list will then display only the computers that match the query criteria for focused viewing.
to open the query selection dialog. Choose the specific computer or computer group and click "OK." The computer list will then display only the computers that match the query criteria for focused viewing.
Mode
Click the "Mode" toggle button ![]() to switch between displaying all computers or only those with assigned tasks.
to switch between displaying all computers or only those with assigned tasks.