How to Use Database Backup Management in Data Backup - AnySecura Manual
This guide will show you how to use the Database Backup Management feature within AnySecura's Data Backup module. You'll learn to create manual backups of critical logs and data, ensuring your information is safely stored on a local drive or network location to prevent data loss and manage storage space.
Building on that, we'll then walk through setting up automated backup schedules. This allows your AnySecura system to handle regular data protection automatically, giving you peace of mind and freeing you from manual tasks.
17.2.1 Backing Up Data
Administrators can use the console's Backup Data feature to regularly back up client data, storing it on another drive or removable storage device. This helps prevent issues caused by large data volumes or insufficient disk space.
Open the backup and view window by selecting Tools → Server Management → Database Backup Management.
| Icon Status | Description |
|---|---|
| Create a new backup task. | |
| Cancel a backup task. | |
| Set up a scheduled backup plan. |
Creating a Backup Task
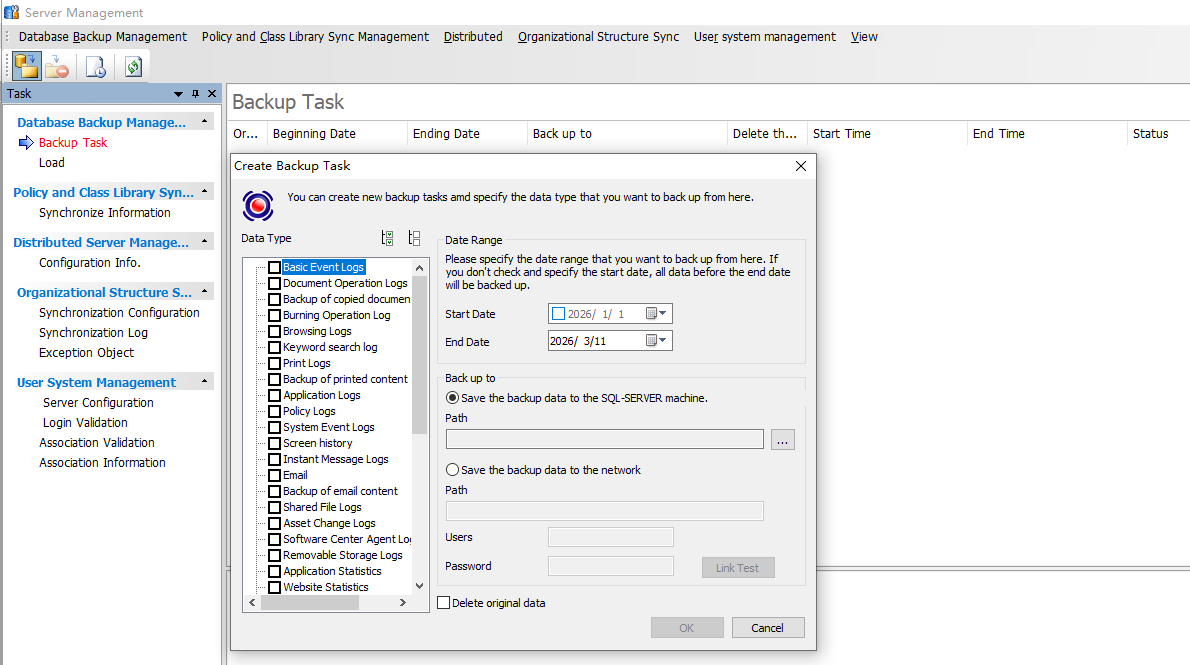
Click the New Task icon on the toolbar to create a backup task. The steps are as follows:
- Select the types of data to back up, including basic event logs, document operation logs, document operation copies, web browsing logs, print logs, email and screen history, and other available data types.
- Choose the date range for the data to be backed up, specifying the start and end dates.
- Select the destination path to save the backup data.
- Check Store backup data on the SQL Server machine and select a path; the backup will be saved to the corresponding path on the SQL Server machine.
- Check Store backup data to a network path and enter the full network path, e.g., \\192.168.1.1\backupdata. Domain names are supported. You must also provide a username and password with read/write permissions for this network path. Click Test Connection to verify access; once successful, the backup data will be saved to the specified network location.
- To free up database space, administrators can check Delete Original Data to automatically remove backed-up data; otherwise, the data will remain in the database.
- Click OK to start the backup task.
Note:
- When storing backup data to a network path, keep the following points in mind:
- 1. If the server and database are on different machines, storing backup data to a network path is not supported.
- 2. During Test Connection, ensure the server and console machines are not using a different username than the one provided for the network path, as this may cause the connection test to fail.
- 3. When loading backups, data from a network path cannot be loaded directly. You must first copy the data from the network path to the server machine before loading.
Adding a Backup Schedule
Click the Backup Schedule icon on the toolbar to open the Backup Schedule Management window. Then click New to create a backup schedule. The steps are as follows:
- Click the Backup Schedule icon on the toolbar to open the Backup Schedule Management window. Then click New to create a backup schedule. The steps are as follows:
- Select the First Backup Time.
- Define the Backup Date Range: Enter the start and end dates. The end date is required, and the unit will match the selected backup frequency. Backups will occur within this range relative to the start time.
- Select Data Types to Back Up: Choose from basic event logs, document operation logs, document operation copies, web browsing logs, print logs, email and screen history, and other available data types.
- Delete Original Data (Optional): Check this option to automatically remove data that has been backed up.
- Select the Backup Destination Path.
- Click OK to save the schedule. The new backup plan will appear in the backup schedule list.
At the scheduled execution time, the system will create a new backup task based on the plan and start it automatically.
Backup Schedule List
The backup schedule list displays the basic attributes of each backup task, including creation time, next execution time, data range, delete original data, and backup path. Tasks can be edited or deleted.
| Field Name | Description |
|---|---|
| Creation Time | The time when the backup task was created. |
| Next Execution | The next scheduled start time for the task. If the task has never run, this shows the first execution time. |
| Data Range | The types of data included in the backup task. |
| Delete Original Data | Indicates whether the backed-up data will be deleted from the database after backup. |
Backup Task List
The backup task list shows the basic properties of each backup task, including start date, end date, backup path, delete original data, backup time, and status. The detailed task list provides information on when each database was backed up.
| Field Name | Description |
|---|---|
| Start Date / End Date | Specifies the date range of the data to be backed up. |
| Backup To | The directory where the backup files are stored. |
| Delete Original Data | Indicates whether the backed-up data will be removed from the database after backup. |
| Start Time / End Time | The start and completion times of the backup task, which indicate how long the task took. |
| Status | The status of a running backup task updates in real time, showing which database is currently being backed up. Other statuses include Task Canceled, Task Completed Successfully, and Task Failed. |
In the backup task list, the right-click menu also provides the following options:
| Menu Item | Action |
|---|---|
| Cancel Task | Stops the currently selected backup task. |
| Delete Log | Deletes the log of the selected task. Incomplete tasks cannot be deleted. |
| Properties | View the conditions and detailed settings of the selected backup task. |
| Refresh | Refreshes the backup task list. |
Note:
- Only one backup task can run at a time. If a backup task is already in progress, new backup tasks cannot be started.
17.2.2 Loading and Unloading Backup Data
Administrators can load backup data from versions 3.0 and 3.1 into the database for viewing. Loading backup data restores it to the server without affecting the existing server data.
Open the backup management window by selecting Tools → Server Management → Database Backup Management. Here, you can view the list of already loaded backup data, as well as load or unload backup data.
Loading Backup Data
Select Backup Management → Load, or click the Load Backup button on the toolbar. Choose the directory containing the backup files, check the data you want to load, and click Load followed by OK to load the selected backup data.
Both local directories and network drives are supported. To load data from a network drive, click Browse Network Location at the bottom of the window, enter the network path (e.g., \\192.168.1.1\backupdata ), which supports domain names, and click OK to confirm the network path.
The backup data list displays the backup date, file path, and file size. For backups from the same day, up to 10 files can be loaded simultaneously.
Loaded backup data can be viewed and queried directly through the console without affecting the existing data on the server.
Note:
- When loading data from a network path, keep the following points in mind:
- 1. The database must be SQL Server 2012 or later.
- 2. Both the SQL Server machine and the specified network path must be in the same domain, and the SQL Server service account must be a domain account with full control over the specified network path.
Unloading Backup Data
If a backup is no longer needed for viewing, it can be unloaded from the server. Select one or more backup data entries, then click the Unload Backup button icon "![]()
![]() ". A list of backups to be unloaded will appear. Click OK to remove them; the corresponding backup data will be deleted, and they will no longer be visible in the console.
". A list of backups to be unloaded will appear. Click OK to remove them; the corresponding backup data will be deleted, and they will no longer be visible in the console.