Transparent Encryption for Data Protection | AnySecura DLP Guide
Learn how AnySecura's Transparent Encryption automatically protects sensitive documents.
Watch Now
This guide will help you understand how to use encryption authorization within AnySecura's Document Security Management module. You'll learn about the two distinct modes available for Windows clients, each designed to protect your sensitive files in a different way.
We'll walk through how to enable either Transparent Encryption for seamless protection or Read-Only Encryption to prevent modifications, and show you where to manage these settings in the AnySecura console. By the end, you'll know exactly how to apply the right level of security for your team's needs.

Learn how AnySecura's Transparent Encryption automatically protects sensitive documents.
Watch NowFor Windows clients, encryption authorization supports two modes: Transparent Encryption and Read-Only Encryption. Both modes cannot be enabled simultaneously.
| Encryption Mode | Description | |
|---|---|---|
| Transparent Encryption | Files open decrypted automatically and are saved encrypted automatically. | |
| Read-Only Encryption | Encrypted files can only be opened in read-only mode and cannot be modified. Non-encrypted files remain unencrypted after being modified and saved. |
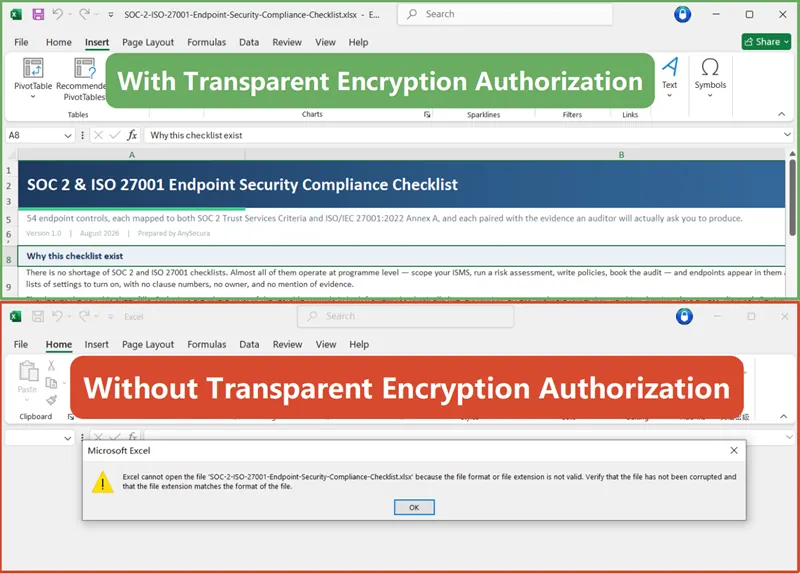
The comparison above shows the same Microsoft Excel file opened on a client with Transparent Encryption authorized (top) versus a client without authorization (bottom). On an authorized client, the encrypted file opens and displays its content normally, while on an unauthorized client the encrypted content cannot be read.
By default, clients are not authorized for encryption. In the computer's basic information, the encryption status is shown as "Unauthorized". Administrators can enable or disable encryption authorization as needed through the computer list, basic information, or computer management in the console.
For clients with Transparent Encryption enabled, a small lock icon appears at the bottom left of the computer tree icon. The basic information shows the encryption status as "Transparent Encryption Authorized".
For clients with Read-Only Encryption enabled, a green dot icon appears at the bottom left of the computer tree icon. The basic information shows the encryption status as "Read-Only Encryption Authorized".
Mac and Linux clients only support Transparent Encryption mode.
In the AnySecura console's computer list, select the target computer or group (if a group is selected, the action applies to all computers in the group). Right-click and choose Encryption Management → Enable Transparent Encryption or Enable Read-Only Authorization to activate the corresponding encryption mode. To remove encryption authorization, select Encryption Management → Disable Encryption Authorization.
In the AnySecura console's basic information section, select a computer group to view details of all computers within it. Select one or more computers, right-click, and choose Encryption Management → Enable Transparent Encryption or Enable Read-Only Authorization to activate the corresponding encryption mode. To remove encryption authorization, select Encryption Management → Disable Encryption Authorization.
In the AnySecura console, go to Tools → Client Management → Computer Management to open the computer management view.
| Icon | Button | Action |
|---|---|---|
 |
Enable Transparent Encryption Authorization | Enable transparent encryption on the computer |
 |
Enable Read-Only Encryption Authorization | Enable read-only encryption on the computer |
 |
Disable Encryption Authorization for the computer | Disable encryption authorization |
Note: