How to Install and Deploy the AnySecura Server | User Guide
This guide will walk you through setting up the core database for your AnySecura server, helping you choose the right SQL Server version for your needs and ensuring a smooth foundation.
You'll then install the server and console modules, register your product to unlock its full capabilities, and learn how to secure your deployment with a unique system verification code.
2.3.1 Database Installation
The server module requires SQL Server 2000 SP4 or later, or SQL Server 2005 SP1 or later. If SQL Server is not available, Microsoft’s free options, MSDE SP4 or SQL Server 2008 R2 Express, can be used.
When using a free database, SQL Server 2008 R2 Express is recommended because it has a larger capacity limit than MSDE and includes a management interface for easier database maintenance.
Note:
- MSDE has a 2GB database size limit, while SQL Server 2008 R2 Express allows up to 10GB. Both have some performance limitations, so for larger data volumes, it is recommended to use SQL Server 2000 or 2005 Standard Edition (or higher).
Ensure that SQL Server 2000 has SP4 installed and SQL Server 2005 has SP1 installed. If the server fails to start, check the system logs under Computer Management → Event Viewer → Application Logs to see if it is a SQL Server version issue.
Installing SQL Server 2008 R2 Express
It is recommended to install SQL Server 2008 R2 Express.
Before installation, ensure the operating system has the following components:
- Windows Installer 4.5
- .NET Framework 3.5
- Windows PowerShell 1.0
The installation disc includes Windows Installer 4.5, .NET Framework 3.5, Windows PowerShell 1.0, and the SQL Server 2008 R2 Express installer.
Installation Steps:
1) Run the SQL Server 2008 R2 Express installer to open the SQL Installation Center.
2) In the Installation section, select New installation or add features to an existing installation, wait for processing, accept the license terms, and click Next.
3) Install required components by clicking Install; after successful installation, click Next.
4) In Feature Selection, use the default options and click Next.
5) In Instance Configuration, select the Default Instance. Using a named instance may prevent the server from starting. Keep other settings default and click Next.
6) In Disk Space Requirements, click Next.
7) In Server Configuration, set the SQL Server Database Engine account to NT AUTHORITY\SYSTEM and click Next.
8) In Database Engine Configuration, choose Mixed Mode Authentication, set a password for the sa account, and leave other settings default. Click Next.
9) In Error Reporting, leave the default options and click Next.
10) Start the installation and wait for it to complete.
2.3.2 Installing the Server and Console Modules
After the database installation is complete, the server and console modules can be installed.
Follow these steps:
1) Double-click AnySecura.exe, select the installation language, and click OK.
2) The welcome screen will appear. Click Next to continue.
3) The installer will prompt you to confirm the installation path. You can choose a different path if needed. It is recommended to select a drive with sufficient free space for the AnySecura server.
4) The installer will prompt you to select the installation type and components. Choose to install the server and console modules as required, then click Next.
5) Choose the Start Menu folder for shortcuts and click Next.
6) Confirm all settings and click Next. After file copying is complete, the installation finishes. Click Finish to complete the process. The server module will start automatically, and a small icon will appear in the system tray.
During installation, the program will check system requirements, including the operating system and SQL Server version. If the installation cannot proceed, follow the prompts to resolve any environment issues.
Administrators can also install the console module separately on other machines to view data and monitor client computers.
2.3.3 Server Registration
Right-click Service Controller, select Tools → Registration, and enter the administrator password to access the registration interface.
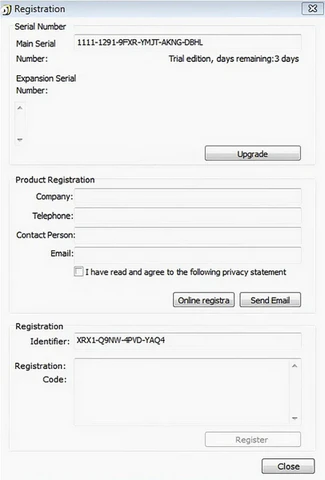
After the server is installed for the first time, AnySecura automatically generates a 30-day trial serial number. The trial serial number does not include encryption functionality.
To activate the full version, the administrator should click the Upgrade button. This makes the Primary Serial Number and Extended Serial Number fields editable. Enter the purchased main and extended serial numbers, then click OK. If the serial numbers are valid, the system will display "Serial Number Upgrade Successful" and prompt that the product needs activation. You must obtain a registration code through product registration to activate the product.
Extended Serial Number authorizations include:
Read-only encryption、Transparent encryption、Sensitive information identification、Secure desktop、USB encryption client
If the server hosting AnySecura has Internet access, there are two registration methods:
- Online Registration
Fill in your company information in the product registration dialog, including company name, contact person, phone number, and email address. Click Online Registration to automatically receive the registration code. Click Register, and the system will display "Registration Successful".
- Email Registration
You can also register via email. In the product registration dialog, enter your company information, including company name, contact person, phone number, and email address. Click Send Email—a mail window will appear. Verify the information and send the email.
The registration code will be sent to the email address you provided. Once received, copy the code into the designated field and click Register. The system will display "Registration Successful", completing the registration process.
Note:
- The email address entered during the first registration is very important. If you need to register again later, the new registration code will be sent to the initially provided email address.
2.3.4 Setting the System Verification Code
The verification code is a unique identifier for the server and clients, in addition to the serial number. Its purpose is to enhance system security. A client can only be managed by the server if its verification code matches the server’s. It is recommended to set the verification code on the server first and then package the client installation program. This ensures the server’s serial number and verification code are included in the client installer, preventing unauthorized servers from taking control of enterprise clients.
After installing the server for the first time:
Right-click Service Controller and select Tools → Checkcode.Enter the administrator account and password to access the verification code settings. Enter the verification code, confirm it by entering it again, and click OK. The verification code will be successfully set.
By default, the verification code is empty. If a client has no verification code, the server will automatically update all connected clients with the newly set verification code, ensuring consistency between the server and clients.
If the server sets a new verification code later, any client that recognizes a previously set verification code matching its own will automatically update its verification code to match the new server code.
Note:
- Administrators must remember the verification code. After reinstalling the server or changing the system, you need it to regain control of previous clients. Otherwise, redeployment of the clients may be necessary.
If a client is running but does not appear in the console, check AnySecura Console → Logs → System Events to see if it is due to a verification code validation failure.
2.3.5 Server Logs
Right-click Service Controller and select Tools → Event logs to open the operating system’s Event Viewer. Select Application to view the SSERVER runtime logs, including server start and stop events, error logs, and more. Administrators can use this information to analyze the server’s operational status.