How to Use Desktop Request Management in Request Management - AnySecura Manual
This guide will help you master the Desktop Request Management feature within AnySecura's Request Management module. You'll learn how to efficiently process employee requests for temporary access, ensuring security policies remain flexible for legitimate work needs.
We'll then explore how to keep approvals flowing by delegating authority and configuring multi-step workflows. This ensures that requests are reviewed promptly and at the appropriate management levels, even when the primary administrator is unavailable.
For operational needs, companies often implement desktop request management policies—such as device control or print control—to regulate and restrict employee access to corporate resources. If an employee needs to temporarily bypass these restrictions for work purposes, they can submit a request explaining the reason. Once approved by an administrator, the relevant desktop management restrictions can be temporarily lifted under specified conditions.
15.1.1 Request Management
By default, desktop request management allows viewing all requests and supports multiple query methods.
Online Approval:
When the client is online, the steps for submitting and approving desktop requests are as follows:
- The client with "Allow" request permission submits a request.
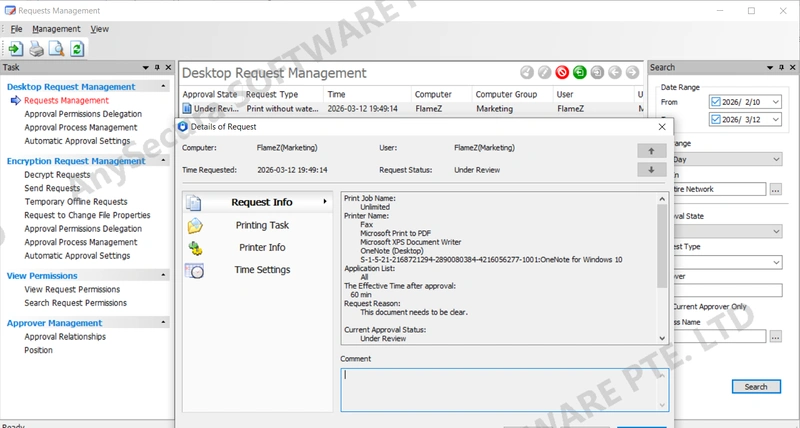
- A notification appears on the console, and the request record can be viewed under Request Management → Desktop Request Management → Request Management, with the status shown as Pending Approval.
- Double-click the request record to view its details and any attached files. If the administrator finds the requested temporary access or duration inappropriate, they can adjust the request content.
- To approve, click Approve; to reject, click Reject.
- Once approved, the request takes effect when the client executes the Enable action in the desktop request management request window.
Offline Approval:
When the client is offline, the steps for desktop request submission and approval are as follows:
- The client with "Allow" request permission submits a request and clicks Offline Request in the desktop request management window to generate an offline request file.
- The administrator receives the request file, right-clicks Import Request File in the desktop request management interface, and imports the file.
- A notification appears on the console, and the request record can be viewed in desktop request management with the status Pending Approval.
- Double-click the request record to review the request details and any attached files.
- To approve, click Approve; to reject, click Reject.
- Select the approved request record, right-click Export Approval Result, and save the file.
- Send the exported approval result file to the client, who imports it in the request management window and activates the request.
Rejecting a Request
Select one or more requests, then right-click and choose Reject, or click the icon ![]() button,and enter the rejection reason to deny the request.
button,and enter the rejection reason to deny the request.
Any administrator with "Reject Approval" permission in the workflow can reject a request. Once rejected, the request is considered denied.
Requests with the status Pending Approval can be rejected. Requests that have been Approved but not yet executed can also be rejected. Even requests currently in execution can be rejected.
Quick Approval
Select multiple requests simultaneously, then click the icon ![]() button or choose Quick Approval from the right-click menu. To approve, click Approve; to deny, click Reject.
button or choose Quick Approval from the right-click menu. To approve, click Approve; to deny, click Reject.
Delete Requests
Administrators with delete permissions can remove requests from Desktop Request Management. In the management view, select one or more requests and choose a deletion mode: Delete Selected Records, Delete Current Page Records, or Delete All Matching Records.
Note:
- Requests in any status can be deleted. If an approved request has not yet been distributed, deleting it will prevent the approval result from being delivered to the client.
15.1.2 Delegation of Approval Rights
When an administrator is away, they can temporarily delegate their desktop application approval rights to a trusted administrator. System administrators can also assist other administrators in delegating their rights to designated personnel. During delegation, both the authorization period and the scope of approval rights can be defined. Once the set period expires, the delegated rights are automatically revoked.
Only administrators with the permission path "Request Management -> Desktop Request Management -> Approval Permissions Delegation" can delegate their rights. Only administrators with Encryption Management Rights are eligible to receive such delegation. System administrators can view all active delegations.
| Icon Buttons | Description |
|---|---|
| An administrator can serve as both a delegator and a delegate, with the option to switch views between rights they have delegated and those they have received. System administrators can also switch to view all administrators' delegations. | |
| Set up approval rights delegation. | |
| Revoke a delegation, i.e., withdraw the delegated rights. |
Delegating Approval Permissions
To delegate approval rights to another administrator, follow these steps:
- From the menu bar, go to Request Management -> Desktop Request Management -> Approval Permissions Delegation to open the delegation window.
- Click the button
 to switch to the Delegation Settings view, then click the button
  to open the Approval Permissions Delegation Settings window.
 - In the General tab, check Enable Delegation, select the delegate administrator, specify the start and end time of the delegation, and enter any remarks.
- Switch to the Functional Permissions tab, select the rights to delegate (either all or specific permissions), and then click OK to confirm.
- You can then view the details of the delegation under Request Management -> Desktop Request Management -> Approval Permissions Delegation -> Delegation Settings.
Sub-delegation of Approval Rights
- With system administrator privileges, click the button in the Desktop Application Approval Delegation interface to switch to View All Delegations, then click the button to open the Sub-delegation Settings window.
- In the General tab, check Enable Delegation, select the delegate administrator, specify the start and end time of the delegation, and enter any remarks.
- Switch to the Functional Permissions tab, select the rights to delegate (either all or specific permissions), and then click OK to confirm.
- You can then view the details of the sub-delegated rights under Request Management -> Desktop Request Management -> Approval Permissions Delegation -> View All Delegations.
Automatic Suspension of Delegation
In both delegation and sub-delegation, the General tab provides an option: Automatically suspend delegation when the delegator is online.
If selected, the delegate is granted the assigned rights only when the delegator is not logged into the console. Once the delegator logs in, the delegation is suspended and the delegate's rights are withdrawn.
This setting only withdraws the rights temporarily while the delegator is logged into the console. Once the delegator logs out, the delegate automatically regains the delegated rights. To revoke the rights permanently, the delegation must be deleted in the Approval Rights Delegation interface.
Note:
- Delegated rights cannot be further delegated or sub-delegated to other administrators.
15.1.3 Approval Workflow Management
Desktop Application Management supports workflow configuration with multi-level approvals, ensuring each request is reviewed and verified at the appropriate management levels.
Administrators with the permissions "View Desktop Applications and Approvals" and "Configure Desktop Approval Workflows" can log into the console and navigate to Request Management -> Desktop Request Management -> Approval Workflow Management to access the workflow interface and manage approval processes.
Function Button Descriptions
| Icon Button | Description |
|---|---|
| Search,Search approval workflows based on specified criteria. | |
 |
New,Create a new workflow. |
| Edit,Edit the selected workflow. | |
 |
Delete,Remove the selected workflow. |
| Copy,Duplicate the selected workflow. | |
| Export,Export the full list of approval workflows in HTML, XLSX, or CSV format. | |
| Move Up,Move the selected workflow one position up. | |
| Move Down,Move the selected workflow one position down. | |
| Replace,After selecting a workflow, replace the current approver with a new one. | |
 |
Cancel,Cancel a new entry or modification. |
| Save,Save changes to apply the new or modified workflow. |
Search Workflow
Click the Search icon "![]() " to open the search dialog. Enter search criteria such as Name, Request Type, Request Object, or Approver. Fuzzy search is supported. Clicking Search will highlight the first matching result; clicking again will move to the next matching entry.
" to open the search dialog. Enter search criteria such as Name, Request Type, Request Object, or Approver. Fuzzy search is supported. Clicking Search will highlight the first matching result; clicking again will move to the next matching entry.
Create Workflow
Click the New icon "" to create a workflow. Each new workflow includes Basic Settings and Workflow Steps. By default, a newly created workflow is not active. To enable it, select the checkbox in front of the workflow name.
Basic Settings include:
| Field | Description |
|---|---|
| Workflow Name | The name of the new workflow. Duplicate names are not allowed. If left blank, the default name is "Approval Workflow". Subsequent workflows will be named "Approval Workflow_1", "Approval Workflow_2", and so on. |
| Request Type | The application types to which this workflow applies. You can select All or specific types. |
| Request Object | The application objects to which this workflow applies. Options include Computer, User, or Role. |
Click the Add icon ![]() to create workflow steps. Multiple steps can be added, and each step can be modified, deleted, or moved up and down. At least one step is required to complete the workflow setup.
to create workflow steps. Multiple steps can be added, and each step can be modified, deleted, or moved up and down. At least one step is required to complete the workflow setup.
Workflow step settings include:
| Field | Description |
|---|---|
| Step Name | The name of the new step. Required field; format is unrestricted, but duplicate names are not allowed. |
| Approvers | The approvers assigned to this step. Multiple approvers can be selected. This field is required.
|
| Approval Criteria | You can set the condition to either "Must be approved by all approvers" or "Must be approved by a specified number of approver" The specified number cannot exceed the total number of approvers.
|
| The approver can modify the request while in this stage | If selected, approvers at this step can adjust the request content as needed. Once approved, the modified version of the request will be executed. |
Note:
- Manager Approval is a multi-level approval process based on predefined approval relationships. The number of levels and the approvers at each level vary depending on the applicant, as determined by the configured approval hierarchy. For details on Manager Approval, see the "Manager Approval" section.
Edit Workflow
Click the Edit button to open the workflow editing page, where you can modify the selected workflow's conditions and environment settings.
Note:
- After a workflow is edited, any pending requests associated with the original version of that workflow will become invalid.
Copy Workflow
Click the Copy button to duplicate the selected workflow. The copied workflow appears at the top of the list, with its name set to the original workflow name plus _N, where N indicates the copy number relative to the original workflow.
All settings of the copied workflow, including its enabled/disabled status, are identical to the original.
Delete Workflow
Click the Delete button to remove the selected workflow. If there are ongoing requests within the workflow at the time of deletion, those requests will be terminated, and the applicants will receive a corresponding notification.
Automatic Approval
Select a workflow, then click the icon "![]() " and choose Set Automatic Approval to configure automatic approval settings:
" and choose Set Automatic Approval to configure automatic approval settings:
| Setting | Description |
|---|---|
| Condition | By default, this option is unchecked, meaning all requests are automatically approved immediately upon submission. If checked, you can set a timeout period. When a request remains unapproved after the specified duration, the workflow continues with automatic approval. |
| Approval Action | The outcome of automatic approval. The default is Auto-Approve, but you can choose Auto-Reject. |
| Approval Comment | The comment recorded during automatic approval. Default is blank. If Auto-Reject is selected, a comment is required. |
Select a workflow with automatic approval enabled, click the icon "![]() " , and choose Cancel Automatic Approval to disable it. Enabling or disabling automatic approval does not alter the original workflow, and requests already in progress remain valid.
" , and choose Cancel Automatic Approval to disable it. Enabling or disabling automatic approval does not alter the original workflow, and requests already in progress remain valid.
Replace Workflow Approvers
Select one or more workflows and click the Replace icon "![]() " to open the Replace Approver dialog. In the dialog, choose the original approver and the new approver. Click OK and save to update the selected workflows with the new approver.
" to open the Replace Approver dialog. In the dialog, choose the original approver and the new approver. Click OK and save to update the selected workflows with the new approver.
Note:
- The original approver can only be selected from approvers included in the selected workflows, while the new approver can be chosen from all users. After replacing the approver, any pending requests associated with the original workflow will become invalid.
Workflow Matching Rules
Requests are matched to workflows in the order they appear in the approval workflow list, from top to bottom. Once a request matches a workflow, no further matching occurs. If a request does not match any custom workflow, it defaults to the Admin workflow for approval.
Once a request is matched to a workflow, it progresses sequentially through each step. Each step must meet its specified approval criteria before moving to the next step. Only the approvers assigned to the current step can approve; approvers from other steps cannot. A request is considered approved only after all steps have been successfully completed.
If a request is at step N and the required number of approvers approve, it moves to step N+1. If the required number of approvals is not met and any approver rejects, the request reverts to step N-1. Approvers at N-1 do not need to re-approve; if any approver clicks Reject, the request moves back to step N-2. If any approver clicks Comment and provides an explanation that satisfies approval criteria, the request returns to step N.
Desktop Request Management also supports veto operations. Any administrator with Veto Approval rights can reject a request at any stage. Once vetoed, the request is marked as rejected and does not return to a previous step. Requests that have been approved but not yet executed cannot proceed if vetoed.
15.1.4 Automatic Approval Settings
Administrators can grant approvers the permission for automatic approval. Once enabled, requests submitted to the designated approvers will be automatically approved.
Approvers must have the "Allow Automatic Approval" permission to enable this feature. Administrators can assign this permission via the console at Tools -> Account Management -> Permissions -> Desktop Request Management , by checking "Allow Automatic Approval".
Enable Automatic Approval
Approvers can log into the console at Request Management -> Desktop Request Management -> Automatic Approval Settings. Click the Edit icon ![]() , check Enable Automatic Approval, and set the active time. By default, it applies all day. You can select a predefined time type from Classification Management -> Time Types, or choose Custom to set a specific time range in the pop-up time selector. Click OK to activate automatic approval.
, check Enable Automatic Approval, and set the active time. By default, it applies all day. You can select a predefined time type from Classification Management -> Time Types, or choose Custom to set a specific time range in the pop-up time selector. Click OK to activate automatic approval.
View Request Details
When a request is automatically approved, the approval action is displayed as "Approved (Automatic)" in the console under Desktop Request Management -> Request Management and on the client under View Desktop Requests -> View Request Details.