How to Use Remote Control and File Transfer in Remote Maintenance - AnySecura Manual
This guide will show you how to use the Remote Control feature within AnySecura's Remote Maintenance module. You'll learn how to securely connect to a client machine to manage it directly, using either user permission or a password for authorization.
Building on that connection, you'll also see how to use the integrated Remote File Transfer to efficiently move files between systems. This combination allows you to resolve issues and distribute resources seamlessly from your AnySecura console.
8.2.1 Remote Control
Remote control allows administrators to operate client machines via the console, facilitating network management, troubleshooting, and quick resolution of system issues.
Select a target computer and go to Maintenance → Remote Control. There are two authorization methods: User Authorization and Password Authorization.
User Authorization
After selecting the target machine, the console prompts the remote user for permission. If the user agrees, the administrator gains access to the control interface; if denied, the session ends.
Password Authorization
After selecting the target machine, the console prompts for the remote control password. Entering the correct password grants access; an incorrect password terminates the session.
Passwords are set on the client machine by pressing Shift + Alt + Ctrl + "ocularrm", which opens the password setup dialog. Clients with a set password can still use user authorization. However, if policies require mandatory confirmation for remote control, only user authorization is allowed.
Remote Control Interface
When a remote control session is active, the target computer shows "Remote Controlling…" in the top-right corner.
Use the toolbar buttons to adjust screen zoom or switch to full-screen mode. Press F12 to exit full-screen.
- The "
 " button toggles between 256 colors and true color.
 - The "
 " button locks or unlocks the target machine's input devices.
 - The "
 " button enables or disables clipboard operations between the console and the target machine.
To send Ctrl-Alt-Del, Ctrl-Esc, or F12 to the remote machine, right-click the AnySecura remote control window's title bar or its taskbar icon, then select Send Ctrl-Alt-Del, Send Ctrl-ESC, or Send F12 from the menu.
Note:
- Remote control supports multi-monitor setups.
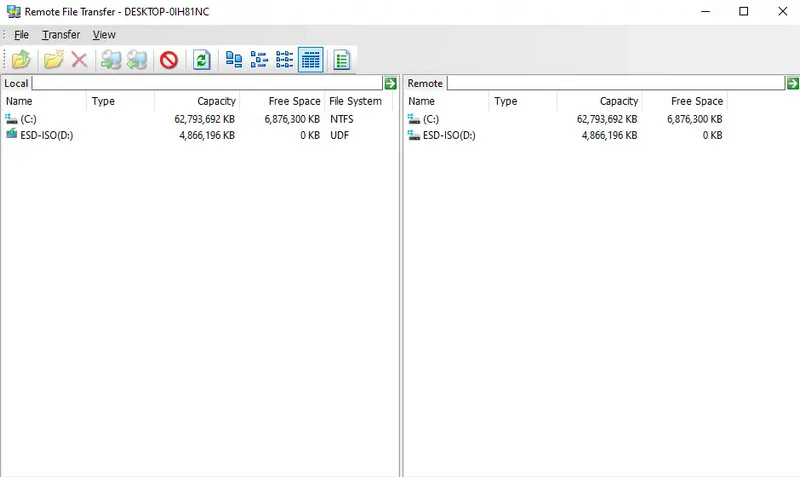
8.2.2 Remote File Transfer
Remote file transfer allows administrators to move files between the console and target client machines, enabling quick distribution and improving efficiency.
Like remote control, it supports two authorization methods: User Authorization and Password Authorization. Once authorized, the console opens the remote file transfer window.
Interface Overview
The remote file transfer window includes a title bar, menu bar, toolbar, local resource view, remote resource view, and status bar.
- Local Resource View: Displays files and folders on the console machine.
- Remote Resource View: Displays files and folders on the client machine.
Double-click a folder to navigate to its subdirectory, or enter a file path directly in the address bar to locate files.
File Operations
Administrators can double-click to enter subdirectories or enter a path directly in the address bar. Use File → Up to return to the parent directory. Basic file operations include creating folders, renaming, and deleting files. These actions cannot be performed in the root directory if the address bar is empty.
Operations in the remote resource view are the same as in the local resource view.
File Transfer
| Transfer Function | Description |
|---|---|
| Local to Remote | Select files on the local machine and choose Transfer → Local to Remote to send them to the target client machine. |
| Remote to Local | Select files on the remote machine and choose Transfer → Remote to Local to copy them to the local machine. |
| Stop Transfer | During transfer, select Transfer → Stop to cancel the operation; the status bar will show transfer failure. |
Drag-and-drop between local and remote views is supported, and multiple files can be transferred at once. No other operations can be performed while a transfer is in progress.
Get file list
Click the button "![]() " in the remote transfer window, configure the file list settings as needed, and click OK to transfer the remote client's file list to the local machine.
" in the remote transfer window, configure the file list settings as needed, and click OK to transfer the remote client's file list to the local machine.
File List Settings:
| Setting | Description |
|---|---|
| Path of File List | Specify the path on the remote client to retrieve the file list. Default is all drives. You can enter a specific path, e.g., D:\test. |
| Include Range | Files or paths within this scope will be included. Default is empty (all included). Supports manual input with wildcards, e.g., *.doc, C:\*, D:\test\*.txt. |
| Exclude Range | Files or paths within this scope will be excluded. Default is empty (none excluded). Supports wildcards, e.g., *.doc, C:\*, D:\test\*.txt. |
| Include System Directory Files | By default, files in the Windows system directory are not retrieved. Check to include them. |
| Include Program Directory Files | By default, files in Program Files are not retrieved. Check to include them. |
| Save File | Specify the location to save the retrieved file list. After retrieval, the results are output to this location. |
Display Modes
Both local and remote views support Large Icons, Small Icons, List, and Details display modes. Click the display icon on the toolbar to select the preferred layout.
Note:
- To transfer files, neither the local nor the remote view can be set to the root directory; otherwise, file transfer is not allowed.