How to Deploy the Client Module in AnySecura | User Guide
This guide will walk you through deploying the AnySecura Client Module, the essential agent that connects your endpoints to the security platform. You'll learn how to create a customized installer for Windows, Mac, or Linux systems using the AnySecura Agent Generator tool.
Once you have your installer, we'll explore efficient deployment strategies for different environments. You can understand how to perform a remote push for large-scale rollouts or leverage domain login scripts for automated installation across your network.
2.6.1 Installing the Client Module
The client module can be deployed using several methods: direct installation, remote push, or domain login script installation. Choose the method that best fits your deployment needs.
Direct installation of the client module requires first creating a client installer, which must then be manually run on the target machine. Administrator privileges are required for installation.
The client installer must be packaged on the server machine:
Windows client: On the server machine, go to Start → All Programs → AnySecura → Agent Generator to open the Windows agent generator tool.
Mac client: On the server machine, go to Start → All Programs → AnySecura → Agent Generator (Mac) to open the Mac agent generator tool.
Linux client: On the server machine, go to Start → All Programs → AnySecura → Agent Generator (Linux) to open the Linux agent generator tool.
The interfaces and usage of all three client packaging tools are similar. The following instructions use the Windows client packaging tool as an example.
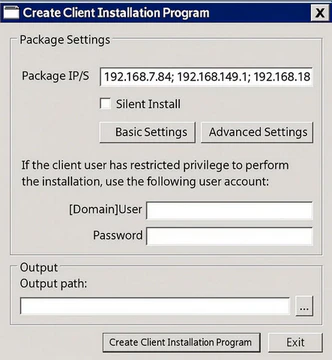
The client installer includes the following configurable parameters:
| Parameter | Description |
|---|---|
| Server IP Address | Default is the current machine's IP. If the server has multiple IPs, enter a valid one. |
| Silent Install | When checked, the installer runs silently without any interface; if unchecked, it runs normally with UI. |
| Interface Settings | Click to configure the installer interface: |
| Title and Icon Setting | Set the window title displayed during installation. You can choose to include the version number or installer name. You may enter custom text in the input field, supporting multiple languages. Custom Installer Title Settings:
English (enu) takes priority. If English is set and other languages are not, those languages will display the English content. If other languages are set, they display their respective content.
 button to browse for a file. Only .ico format files are supported. button to browse for a file. Only .ico format files are supported.
|
| Installer Package Properties | Set the file description and product name displayed for the installer. |
| Advanced Settings | Click to access advanced options: |
| Package configuration to a separate file |
|
| Upgrade UAC Privileges | Installer runs with administrator privileges when checked. |
| Installer Password | Require a password to run the installer. |
| User License | Include a user license agreement; installation proceeds only after acceptance. |
| Import Agent Policy | Click the button to select an exported client policy .ipz file from the console (see the "Policy Export" section in the console chapter). After installation, the client will automatically import the policy and synchronize with the server once connected.
For certain features that require a .dat file, you can import it along with the client policy. Place the policy file and the .dat files in the same directory and select all files to include them in the installer. |
| Expiration | Installer becomes invalid after the specified date/time. |
| Username and Password | If the logged-in user lacks admin rights, provide admin credentials here to ensure successful installation. |
| Output Path | Set the installer filename, format (.exe or .msi), and save location. |
Click the "Create" button to generate the client installation package.
Note:
- 1. Packaging the installation configuration into a separate file allows the installer to include a digital signature, reducing the risk of false antivirus alerts during installation.
- 2. Silent installation and advanced settings are not supported when packaging Mac or Linux clients.
- 3. The options "Silent Install" and "Upgrade UAC Privileges" cannot be selected simultaneously.
2.6.2 Remote Deployment of Clients
For large organizations with numerous and widely distributed computers, manual installation on each machine is time-consuming and inefficient. Remote deployment solves this problem by allowing batch installation of client software without physically accessing each computer.
On the machine with AnySecura Server installed, go to Start → All Programs → AnySecura → Agent Remote Installer to launch the remote installation tool.
This tool supports installation on Windows NT 4.0, 2000, XP (x86/x64), 2003 (x86/x64), 2008 (x86/x64), Vista (x86/x64), and Windows 7 (x86/x64). For Windows 9x or ME machines, clients must be installed locally on the target computer.
Scan Settings:
By default, the system scans all computers within the local subnet. To scan computers in other subnets, open the scan settings dialog via File → Scan Settings, add the desired IP ranges, and optionally adjust the scanning interval.
The icons in the computer list indicate the following statuses:
| Icon | Color | Window NT4/2000/XP | Window 95/98/Me | Online | Agent Installed |
|---|---|---|---|---|---|
| Dark Blue | Yes | No | Yes | No | |
| Dark Blue | No | Yes | Yes | No | |
| Gray | Yes | No | No | No | |
| Gray | No | Yes | No | No | |
| Light Blue | Yes | No | Yes | Yes | |
| Light Blue | No | Yes | Yes | Yes |
Remote Installation
Select the target computers for client module installation. You can choose multiple machines simultaneously, then click Operation → Install to begin. The installation status for each computer will be displayed in the status bar, and all logs can be viewed in the installation log window below.
【Common Issues】
- The currently logged-in user lacks administrative privileges on the target computer. In this case, an error window will appear; provide a username and password with administrator rights on the target machine.
- The target computer does not have the admin share enabled. Open a command prompt (cmd.exe) on the target computer and run net share to check if the ADMIN$ share is active. If not, execute net share ADMIN$ to enable it.
- The target computer cannot access your local shared files. This may be because the Admin$ share on your machine is disabled or the target computer lacks permission to access it.
Note:
- 1. Mac and Linux clients do not support remote push installation.
- 2. Due to certain security restrictions in Windows NT networks, remote installation may fail if sufficient permissions are not available. In such cases, install the client directly on the target machine using the AnySecura client installer.
2.6.3 Installation via Login Script
In a domain environment, clients can be installed automatically by modifying the domain login script. When a Windows user logs in to the domain, the script executes and installs the AnySecura client on their machine.
Steps:
1) Locate the LogonScript folder on the installation CD and copy the entire directory to the domain server.
2) On the AnySecura server, create a client installer and name it OAgentInst.exe.
3) Copy OAgentInst.exe into the LogonScript folder on the domain server.
4) Run LgnManV3.exe in the domain server’s LogonScript folder to configure the domain login script.
Instructions:
1) After running LgnMan.exe, the interface will display a sorted list of user groups from the domain server. It shows the login script status for each user. A green background on a user icon indicates that the login script already includes the AnySecura client installation command.
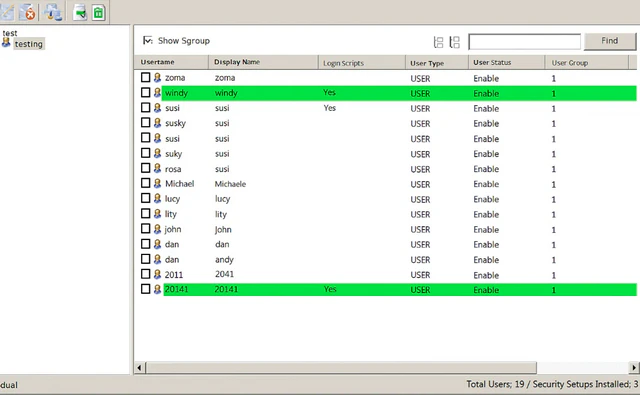
2) Administrators can click the column headers to sort the list and use CTRL or SHIFT to select multiple users. In the menu bar under Tools or via the function buttons, they can set or remove the installation commands.
3) Users with installation commands will trigger the domain login script upon logging in, automatically installing the AnySecura client on their computers.
4) Once the AnySecura client is successfully installed, the administrator can remove the installation commands for those users, restoring their login scripts to the original state.
Button Functions:
| Icon | Function |
|---|---|
| Set installation command – adds the installation command to the selected users’ login scripts. | |
| Remove installation command – deletes the installation command from the selected users’ login scripts. | |
| Set installation scope – defines the range of computers for domain login script installation using IP addresses or computer names, including both included and excluded ranges; supports cross-subnet addresses. | |
| Export – exports the domain script tool list in Web, Microsoft Excel, or text file formats. | |
| Refresh – updates the list view. |
Note:
- Mac and Linux clients do not support installation via domain login scripts.