How to Use Server Settings in Web Console with AnySecura | User Guide
This guide will help you configure core server parameters through the AnySecura Web Console, ensuring your system operates exactly as your organization requires. You'll learn how to access the Server Settings menu, a powerful area reserved for system administrators.
We'll then walk through setting up key features like approval request email notifications, which keep your team responsive by alerting approvers directly. You'll also see how to automate client computer grouping by IP and enforce secure domain account verification, giving you greater control over your AnySecura environment.
When a system administrator logs in to the WEB console, they can configure server parameters under "Settings" in the navigation bar.
The WEB server must be deployed on the machine where the AnySecura server is installed, and the logged-in administrator must have system administrator privileges. Only then will the "Settings" option appear in the navigation bar menu.
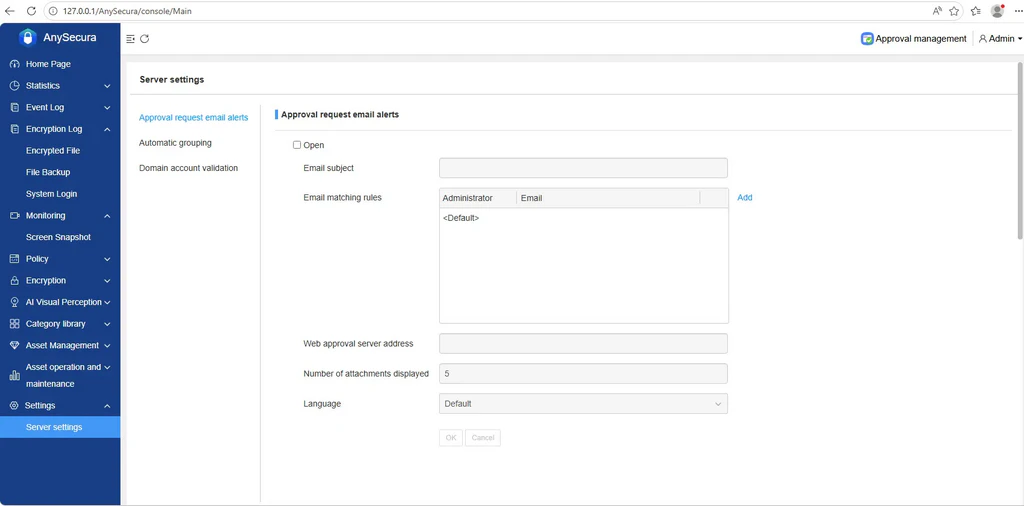
31.13.1 Server Settings
Select "Settings → Server Settings" in the navigation bar to open the server parameter configuration interface. Currently supported settings include: approval request email notifications, automatic grouping, and domain-verified accounts.
When modifying one feature, you must save or cancel the changes before configuring another feature.
Approval Request Email Notification
This feature adds email notifications for approval requests. After a client submits a request, the approver’s email will receive a notification to ensure timely approval.
Supported request types include:
- Encrypted document requests (decryption requests, external sharing requests, temporary offline requests, security attribute change requests)
- Desktop management requests (print requests, device requests, removable media requests, watermark requests)
First, configure the mail report server in the console under "Tools → Options → Email Report Server Settings." Then, log in to the WEB console, select "Settings → Server Settings → Approval Request Email Notification," check "Enable," set the required parameters, and save to activate the feature.
Corresponding Parameter Settings
| Parameter | Description |
|---|---|
| Enable | Whether to enable the feature. Must be checked before editing other options. |
| Email Subject | The subject of the notification email. Optional; if empty, the email subject shows only the system default format: Computer (User) – Request Type (Specific Type). |
| Email Matching Rules | Rules for recipient email addresses, including default and custom rules. When both exist, custom rules take priority; if no match, default rules are applied. Click the top-right Add button to create a custom rule, specifying the administrator and email address. Click on the administrator or email information to edit; hover over an item and click the X button to delete it. |
| Default Rule | Required. Format: *@[email domain], e.g., *@gmail.com, *@outlook.com. The approver’s name replaces *. For example, if the default rule is *@gmail.com and approvers are test1 and test2, both [email protected] and [email protected] will receive notifications. |
| Custom Rule | Optional. Must specify the full email address; * cannot be used. Each administrator corresponds to one email. For example, if the default rule is default=*@tec.org and the custom rule is Administrator test = [email protected], only [email protected] receives notifications for test; [email protected] does not. |
| WEB Approval Server Address | URL to access the WEB approval server. Optional. |
| Number of Attachments Displayed | Number of attachments shown in the email. 0 shows all; empty defaults to 5. |
| Language | Language of the notification email. Options: Default (based on server OS language), Simplified Chinese, Traditional Chinese, English, Japanese. |
The email interface includes the email subject and body content:
- Email Subject: Administrator-defined title – Computer (User) – Request Type
- Body Content: Request information (computer, computer group, user, user group, request time, reason, document name) and a link to "Go to Approval."
Automatic Grouping
The automatic grouping feature allows you to assign IPs or IP ranges to specific groups. Newly installed client computers will be automatically assigned to the group that matches their IP. Computers already in "Ungrouped" are unaffected.
Log in to the WEB console and select Settings → Server Settings → Automatic Grouping to access the automatic grouping setup page. Click the + button to add a group name and corresponding IP information. To modify a group name or IP, click the information field to edit. To delete an entry, hover over it and click the X button. After configuring, click Confirm to save.
Format Settings:
- IP addresses can be single IPs, IP ranges, or a combination of IPs and ranges. Multiple IP conditions are separated by commas.
- IP ranges can span multiple subnets, e.g., 192.168.1.1–192.168.3.106.
- When multiple rules are set, they are matched from top to bottom. Once a match is found, lower rules are ignored.
- If multiple groups have the same name in the computer tree, matched computers are randomly assigned to one of them.
- If no rules match, the computer is assigned to "Ungrouped."
Domain-Verified Account Feature
The domain account verification feature ensures that only the owner of a domain account can use it, preventing creators from gaining elevated permissions by creating new accounts. It supports multi-platform login verification, including the console, proxy console, WEB console, WEB approval, approval app, report console, WEB reports, and distributed master console.
Log in to the WEB console and select Settings → Server Settings → Domain-Verified Account to access the domain verification account settings page. The parameter descriptions are as follows:
| Setting | Description |
|---|---|
| Enable | Check to activate this feature. Only when this option is enabled can the settings below be edited and take effect. |
| Domain Name | Required. Enter the full domain name of the domain server. |
| Domain Server Address | Required. Enter the IP address of the domain server. |
Changes take effect only after restarting the AnySecura server. Currently, only one domain server is supported.
After enabling domain account verification, the built-in accounts Admin and Audit continue to use their console-set passwords for login. All other accounts must use their domain passwords, and the console cannot modify these passwords. If an administrator account name does not exist on the domain server, login will be denied.