How to Use USB Encryption Client in Installation And Deployment - AnySecura Manual
This guide will walk you through setting up the AnySecura USB Encryption Client, starting with the essential step of registering your licenses with the vendor. Once you import the provided certificate into the console, you'll be ready to create your secure, portable storage.
You'll then learn how to generate the client installer and transform a standard USB drive into an encrypted client authorized by your AnySecura server. By the end, you'll understand how to manage these devices and assign specific encryption policies to them.
2.7.1 Registration
To use the USB Encryption Client, registration is required. Contact the vendor and provide your main serial number along with the number of USB Encryption Client licenses needed. The vendor will generate the registration file USBALicenseCertFile.dat.
Log in to the console, navigate to Tools → Client Management → USB Encryption Client Management, and in the pop-up window, click Import to select the USBALicenseCertFile.dat file. After importing, the available license count and validity period will be displayed at the bottom of the window.
2.7.2 Creating the USB Encryption Client
Creating the USB Encryption Client involves two main steps:
- Generating the USB client program files.
- Turning a specified USB drive into an encrypted client.
Download and extract the USB Encryption Client package. Copy AInstGen_SDUDisk.exe and AKernel3U.e32 to the server installation directory, and copy the UDiskSetup folder to the machine where the USB drive will be created.
Generating the USB Client Program
Run AInstGen_SDUDisk.exe on the server machine to open the creation interface.
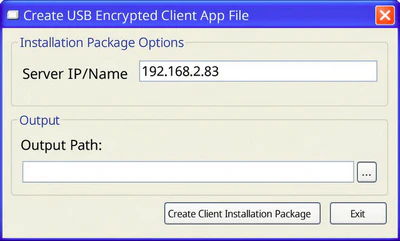
Parameters:
| Name | Description |
|---|---|
| Server IP/Name | Defaults to the current machine's IP. If the server has multiple IPs, enter a valid one. You can also use a machine name that is reachable. |
| Output Path | Specifies the file name and storage location of the USB Encryption Client installer. The generated file type is .ipk. |
Click Create Client Installation File to generate the USB Encryption Client installer.
Creating the Encrypted USB Client
Insert a USB drive into the computer. Run SDUDiskFormatter.exe from the UDiskSetup folder, select the USB drive under removable drives, choose the previously generated USB client installer file, and click Start Creation. Wait for the process to complete.
2..7.3 Authorization
After creating a portable USB Encryption Client, the USB drive must be authorized; otherwise, encryption features will not be enabled.
Open the prepared USB drive and run USDconf.exe. The USB Encryption Client Policy Update Tool will appear. Click Export Removable Disk Info to save the USB’s information as a .uea file.
In the console, go to Tools → Client Management → USB Encryption Client Management. In the management window, click the ![]() button to add USB client authorization, then select the .uea file to authorize the USB.
button to add USB client authorization, then select the .uea file to authorize the USB.
Once authorized, a USB Encryption Client node will appear under the selected group in the computer tree. Initially, the node will appear gray because it has not yet been used on any computer. The client will inherit the group’s encryption policies by default, but specific encryption policies can also be assigned to it.